Nissan Frontier: Safety - Seats, Seat Belts and Supplemental Restraint System - Child restraints
- Precautions on child restraints
- LATCH (Lower Anchors and Tethers for CHildren) system
- Rear-facing child restraint installation using LATCH (Crew Cab models)
- Rear-facing child restraint installation using LATCH - jump seat (King Cab models)
- Rear-facing child restraint installation using the seat belts (Crew Cab models)
- Rear-facing child restraint installation using the seat belts - jump seat (King Cab models)
- Forward-facing child restraint installation using LATCH (Crew Cab models)
- Forward-facing child restraint installation using LATCH - jump seat (King Cab models)
- Forward-facing child restraint installation using the seat belts - front passenger and rear bench seat (Crew Cab models)
- Forward-facing child restraint installation using the seat belts - front passenger and jump seats (King Cab models)
- Booster Seats for Nissan Frontier
Precautions on child restraints Nissan Frontier D41
WARNING
- Failure to follow all warnings, recommendations, and installation instructions for child restraints may
result in serious injury or death to a child or other occupants during a sudden stop, emergency
maneuver, or collision:
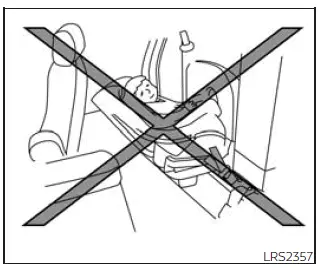
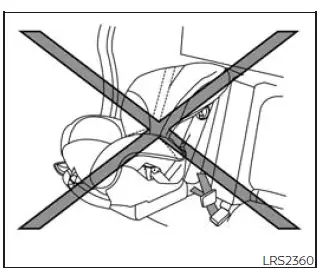
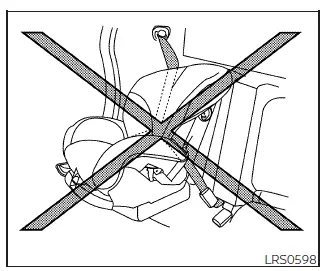
- Do not install rear-facing child restraints in the driver's side rear seating position.
- For forward-facing child restraints and booster seats, DO NOT install the restraint if its base extends beyond the forward edge of the seat cushion.
- The child restraint must be installed and used correctly at all times. Always follow every instruction supplied by the child restraint manufacturer regarding installation, adjustment, inspection, and daily use.
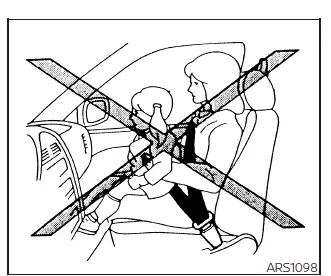
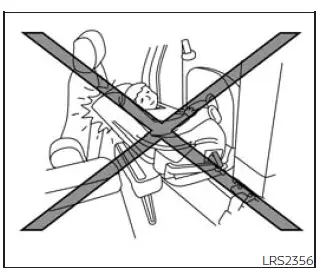
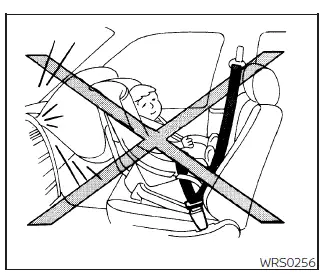
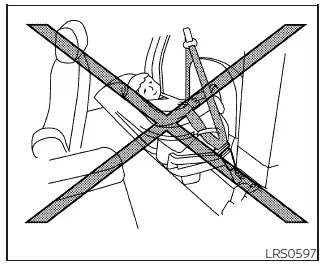
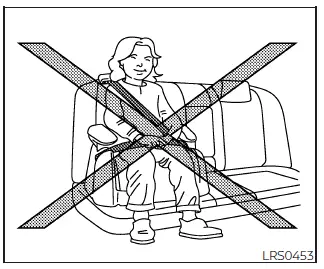
- Infants and children should never be carried on another passenger's lap. During a collision, even the strongest adult cannot safely hold a child against the tremendous forces involved.
- Never secure a child and another passenger with the same seat belt.
- NISSAN recommends installing all child restraints in the rear seating area whenever possible. Safety studies consistently show that children are generally safer when properly restrained in the rear seat than in the front passenger seat. If a forward-facing child restraint must be installed in the front seat, carefully follow all applicable instructions and precautions.
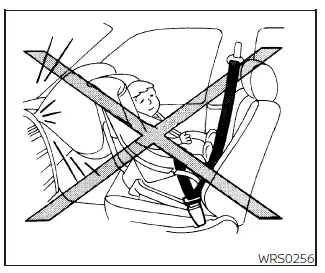
- Even when equipped with the NISSAN Advanced Air Bag System, never install a rear-facing child restraint in the front passenger seat. If the air bag deploys, the child could suffer severe injury or death. Rear-facing child restraints must always be installed in the rear seating area of the Nissan Frontier.
- Always select a child restraint that is suitable for both the child and the Nissan Frontier. Not all child restraint systems fit every vehicle properly.
- Child restraint anchor points are engineered exclusively for properly installed child restraint
systems. They are not designed to secure adult seat belts, cargo, accessories, or any other
equipment to the vehicle.
Using anchorages for unintended purposes may damage the anchoring system. A damaged anchorage may prevent proper child restraint installation, increasing the risk of serious injury or death in a collision.
- Never use child restraint anchor points for adult seat belts or other vehicle accessories.
- A child restraint equipped with a top tether strap should not be installed in the front passenger seat of King Cab Nissan Frontier models.
- After installing a child restraint, keep the seatback as upright as possible while maintaining a secure installation.
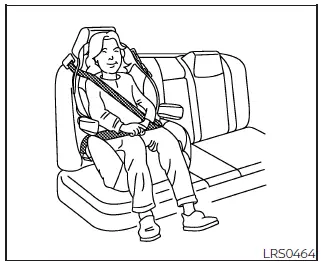
- Infants and children should always travel in an appropriate child restraint system that matches their age, height, and weight.
- When a child restraint is not being used, secure it using the LATCH system or the vehicle seat belt. During sudden braking or a collision, an unsecured child restraint may become a dangerous projectile and could injure occupants or damage the Nissan Frontier.
CAUTION
A child restraint left inside a closed vehicle can become extremely hot, especially during warm weather. Before placing a child in the restraint, always check the seating surfaces, harness components, buckles, and exposed parts to help prevent burns or discomfort.
The Nissan Frontier is equipped with a universal child restraint anchoring system known as LATCH (Lower Anchors and Tethers for Children). Many modern child restraints include rigid connectors or webbing-mounted attachments that can be connected directly to these anchor points for a secure installation.
If your child restraint is not compatible with the LATCH system, the vehicle's seat belt system may be used to properly secure the restraint.
Numerous manufacturers offer child restraint systems designed for infants, toddlers, and older children. When selecting a child restraint for your Nissan Frontier, consider the following important recommendations:
- Choose only a child restraint that displays certification indicating compliance with Federal Motor Vehicle Safety Standard 213 or Canadian Motor Vehicle Safety Standard 213.
- Before purchase, verify that the child restraint fits properly on the vehicle seat and works correctly with the Nissan Frontier seat belt or LATCH system.
- If the restraint appears compatible with your vehicle, place your child in the restraint and verify that all adjustments, harness positions, and support features are suitable for the child's size. Always select a restraint designed specifically for the child's height and weight range and follow all manufacturer recommendations.
- If the combined weight of the child and the child restraint is less than 65 lbs. (29.5 kg), either the LATCH system or the vehicle seat belt may be used for installation. However, both systems should not be used simultaneously unless specifically permitted by the child restraint manufacturer.
- If the combined weight of the child and child restraint exceeds 65 lbs. (29.5 kg), install the child restraint using the vehicle seat belt system rather than the lower LATCH anchors.
- Always follow the child restraint manufacturer's installation instructions carefully and inspect the installation regularly to ensure continued safety.
All U.S. states and Canadian provinces or territories require infants and small children to be secured in an approved child restraint system whenever a vehicle is in operation. In Canada, regulations also require that the top tether strap of a forward-facing child restraint be attached to the designated tether anchor point provided in the Nissan Frontier. Proper installation and regular inspection of child restraint systems are essential to maximizing child passenger safety during every trip.
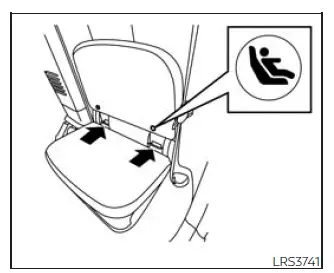
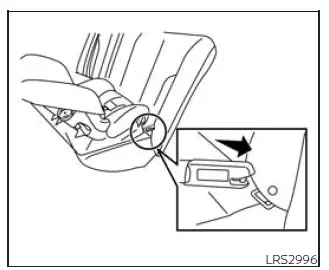
LATCH (Lower Anchors and Tethers for CHildren) system Nissan Frontier 2026
Basic Information
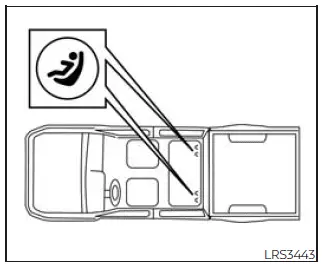
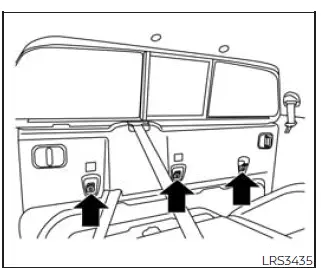
LATCH system lower anchor locations
(Crew Cab models)
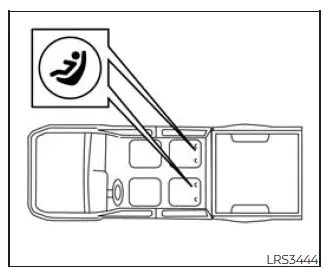
LATCH system lower anchor locations
(King Cab models)
Your Nissan Frontier is equipped with specially engineered anchor points designed for use with child restraints that are compatible with the LATCH (Lower Anchors and Tethers for Children) system. Depending on the market and manufacturer, this system may also be referred to as ISOFIX or ISOFIX-compatible. The LATCH system provides a secure method of installing child restraints without relying on the vehicle seat belt, provided that the combined weight of the child and child restraint does not exceed 65 lbs. (29.5 kg).
If the total weight of the child and restraint exceeds 65 lbs. (29.5 kg), the Nissan Frontier seat belt system must be used instead of the lower LATCH anchors. Always consult and follow the child restraint manufacturer's instructions in addition to the recommendations contained in this Nissan Frontier owner's manual.
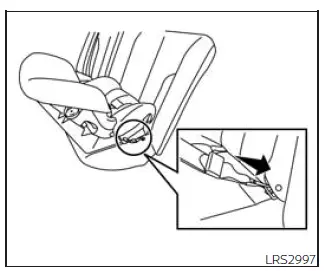
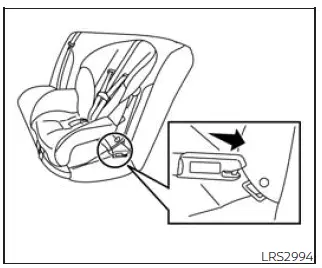
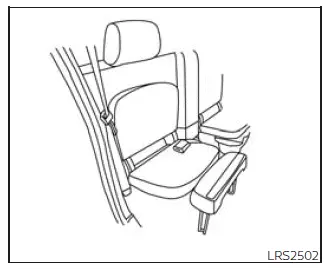
The lower LATCH anchor points are available only in the designated rear outboard seating positions. Never attempt to install a child restraint in the rear center seating position using the lower LATCH anchors, as doing so may result in improper installation and reduced protection.
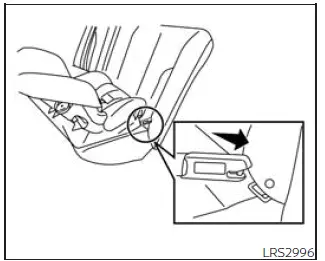
LATCH lower anchor
WARNING
Failure to follow all warnings and installation procedures for child restraint systems can result in serious injury or death to a child or other vehicle occupants during a collision or sudden stop.
- Attach LATCH-compatible child restraints only to the anchor locations specifically identified in the illustrations and vehicle documentation.
- Never attempt to secure a child restraint in the rear center seating position using the lower LATCH anchors. The restraint will not be properly secured.
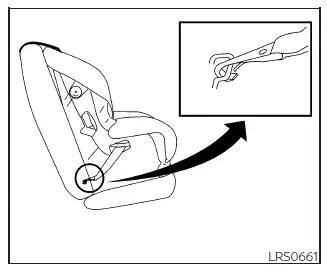
- Before installation, inspect the lower anchor area by inserting your fingers into the anchor access points. Verify that no seat belt webbing, seat cushion material, debris, or other obstructions interfere with the anchors. Any obstruction may prevent the child restraint from being installed correctly.
Child restraint anchorages are specifically designed to withstand the forces generated by properly installed child restraint systems.
Under no circumstances should these anchorages be used to secure adult seat belts, cargo straps, harnesses, accessories, or other equipment. Misuse may damage the anchor system, resulting in improper child restraint installation and increasing the risk of severe injury or death in a collision.
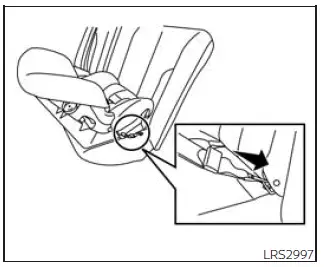
LATCH lower anchor location
LATCH locations (King Cab models)
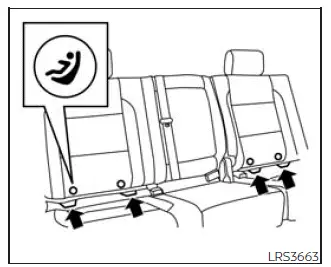
LATCH locations (Crew Cab models)
LATCH locations (Crew Cab models)
The lower LATCH anchors in the Nissan Frontier are positioned as illustrated. Labels attached to the seatbacks help identify the exact anchor locations, making installation easier and helping ensure proper child restraint positioning. Before each installation, visually confirm the anchor locations and verify that the restraint connectors engage fully with the anchor points.
Installing child restraint LATCH lower anchor attachments
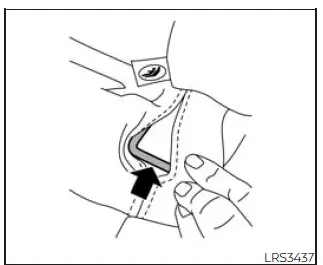
LATCH webbing-mounted attachment
LATCH rigid-mounted attachment
LATCH-compatible child restraints are equipped with two attachment connectors, which may be rigid-mounted or connected by webbing straps. These connectors attach directly to the designated anchors provided in specific seating positions within the Nissan Frontier. When properly installed, the LATCH system creates a secure connection between the child restraint and the vehicle structure.
Because the restraint attaches directly to the anchor points, a vehicle seat belt is generally not required for installation unless weight limitations dictate otherwise. Always verify that your child restraint carries a label indicating LATCH compatibility. This information may also be found in the documentation supplied by the child restraint manufacturer.
Before installing any child restraint, carefully review both the Nissan Frontier owner's manual and the instructions provided with the restraint system. Proper installation is essential for achieving the highest level of child passenger protection.
Top tether anchor
WARNING
- Do not allow cargo, luggage, tools, or other objects to contact the top tether strap while it is attached to the top tether anchor. Secure all cargo properly so it cannot interfere with the tether system. During a collision, contact with unsecured cargo may damage the tether strap, reducing the effectiveness of the child restraint and increasing the risk of serious injury or death.
- Child restraint anchorages are engineered solely for use with properly installed child restraint
systems.
These anchor points must never be used for adult seat belts, harness systems, cargo retention devices, or other vehicle accessories.
Using anchorages for unintended purposes can damage the mounting points. A damaged anchorage may prevent proper child restraint installation and could result in severe injury or death during an accident.
Rear bench seat (Crew Cab models)
Top tether anchor point locations
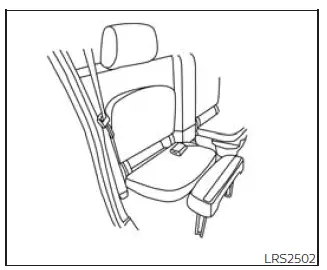
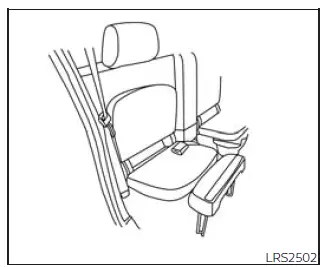
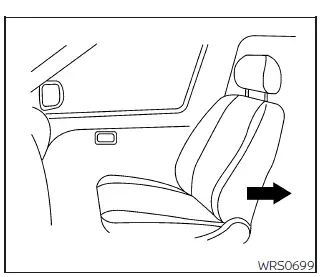
In Nissan Frontier Crew Cab models, the top tether anchor points are located beneath the rear window behind the rear bench seat, as illustrated. These anchors provide an additional attachment point that helps reduce forward movement of a child restraint during a collision.
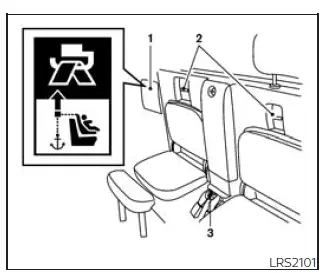
Jump seats
(King Cab models - passenger side
shown)
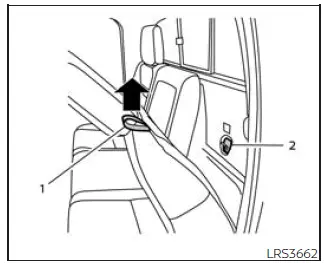
- Cover plate
- Routing bracket
- Anchor point
- On King Cab Nissan Frontier models, the tether anchor point is located on the floor between the jump seat belt buckles near the center of the vehicle, as shown in the illustration.
The anchor point is positioned on the floor between the jump seat belt buckles in the center area of the vehicle. The routing bracket is located beneath the rear window behind the cover plate above the jump seat. When installing a top tether, route the tether strap exactly as specified by the child restraint manufacturer and confirm that it is free from twists or obstructions. Correct use of the top tether system significantly improves child restraint stability and overall safety in the Nissan Frontier.
Rear-facing child restraint installation using LATCH (Crew Cab models) Nissan Frontier D41
Do not use the lower LATCH anchors if the combined weight of the child and the child restraint exceeds 65 lbs. (29.5 kg). When the total weight is greater than this limit, the child restraint in your Nissan Frontier must be installed using the vehicle's seat belt system rather than the lower anchors. Always review and follow the instructions supplied by the child restraint manufacturer, as well as the recommendations provided in the Nissan Frontier owner's manual.
Follow the procedure below to properly install a rear-facing child restraint in the rear seating area of your Nissan Frontier Crew Cab using the LATCH system:
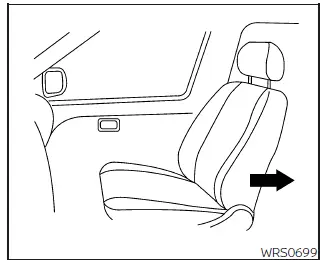
1. Position the child restraint on the seat.
Carefully place the rear-facing child restraint in the desired rear outboard seating position. Ensure that the restraint sits flat against the vehicle seat cushion and seatback. Always follow all instructions provided by the child restraint manufacturer to achieve the safest installation possible.
Rear-facing webbing-mounted - step 2
Rear-facing rigid-mounted - step 2
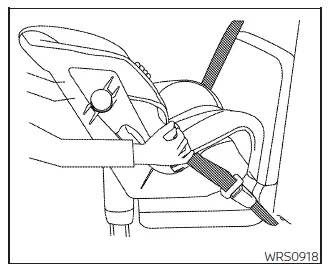
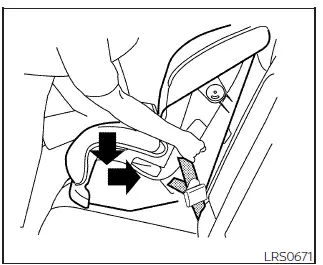
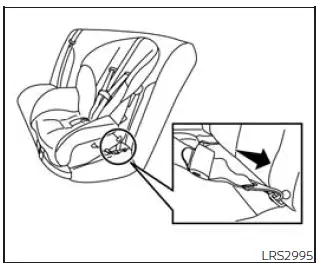
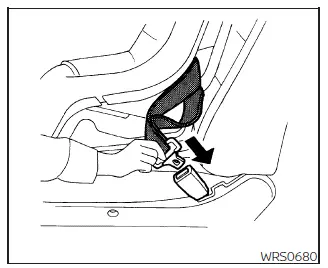
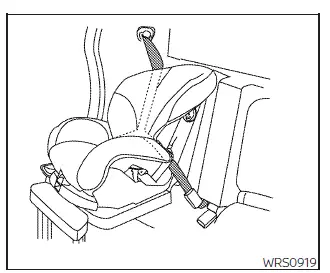
2. Secure the child restraint anchor attachments to the LATCH lower anchors.
Connect the child restraint's lower attachment connectors to the designated LATCH anchor points in the Nissan Frontier. Once attached, carefully inspect each connector to verify that it is fully engaged and locked onto the anchor. Improperly connected attachments may reduce the effectiveness of the child restraint during an accident.
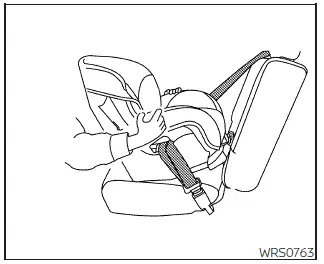
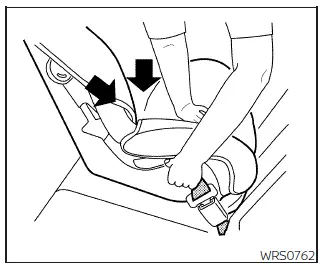
Rear-facing - step 3
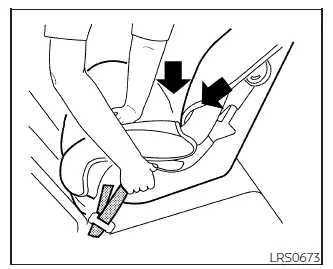
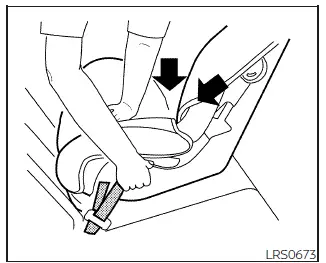
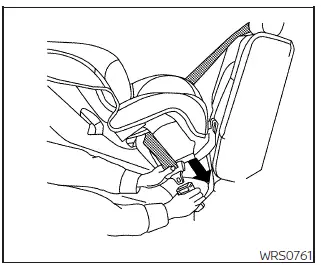
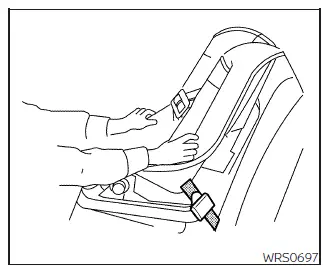
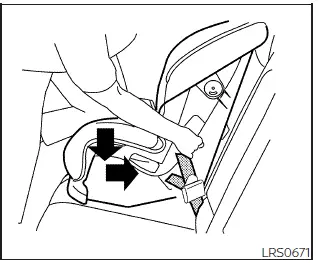
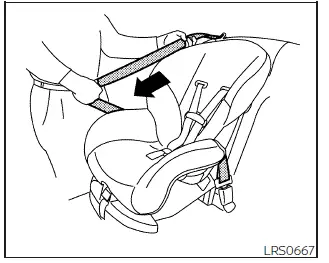
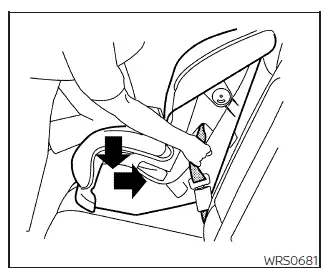
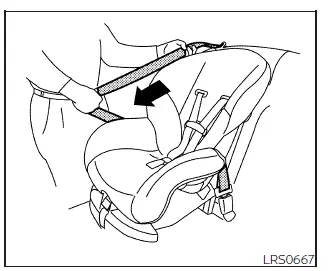
3. For child restraints that are equipped with webbing-mounted attachments, remove any additional slack from the anchor attachments. Press downward and rearward firmly in the center of the child restraint with your hand to compress the vehicle seat cushion and seatback while tightening the webbing of the anchor attachments.
Applying firm pressure while tightening the straps helps achieve a secure installation by minimizing movement between the child restraint and the Nissan Frontier seat structure. Continue tightening until the restraint feels stable and securely mounted.
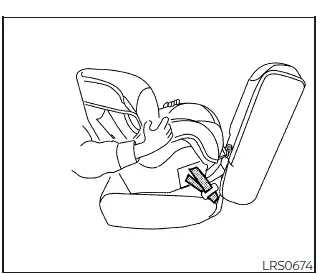
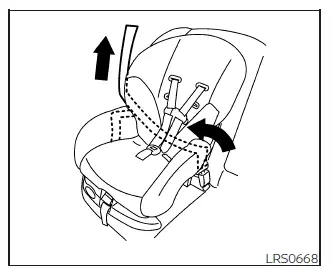
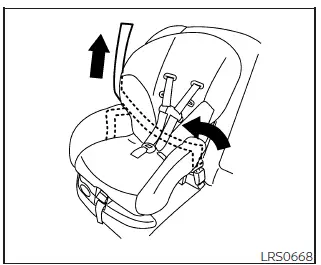
Rear-facing - step 4
4. After attaching the child restraint, test it before you place the child in it. Push it from side to side while holding the child restraint near the LATCH attachment path. The child restraint should not move more than 1 inch (25 mm), from side to side. Try to tug it forward and check to see if the LATCH attachment holds the restraint in place. If the restraint is not secure, tighten the LATCH attachment as necessary, or put the restraint in another seat and test it again.
Performing this verification step is essential for child safety. A correctly installed rear-facing child restraint in the Nissan Frontier should remain firmly secured with minimal movement. If excessive movement is detected, repeat the installation procedure and recheck all attachment points.
You may need to try a different child restraint or install the restraint using the vehicle seat belt system if permitted by the manufacturer. Not all child restraint designs are compatible with every vehicle seating configuration, including some Nissan Frontier models.
5. Check to make sure the child restraint is properly secured prior to each use. If the child restraint is loose, repeat steps 2 through 4.
Before every trip, inspect the installation to confirm that all LATCH attachments remain secure and properly tightened. Regular checks help ensure that the child restraint continues to provide optimal protection. Taking a few moments to verify the installation each time you drive your Nissan Frontier can significantly improve child passenger safety and peace of mind.
Rear-facing child restraint installation using LATCH - jump seat (King Cab models) Nissan Frontier D41
WARNING
- If a child restraint system is installed incorrectly, the child may be exposed to a significantly
increased risk of serious injury or death during a sudden stop, emergency maneuver, or collision.
- Never install a rear-facing child restraint system on the driver's side jump seat of a Nissan Frontier King Cab.
- Do not install a child restraint on the passenger-side jump seat unless the seat extender has been fully unfolded and properly positioned.
WARNING
- When installing a rear-facing child restraint on the passenger-side jump seat, the front passenger seat
must be moved completely forward and the seatback must be placed in the upright position or tilted fully
forward. Failure to create sufficient clearance may prevent proper installation of the child restraint
and could result in serious injury or death during a collision.
- The front passenger seat cannot be occupied when a rear-facing child restraint is installed on the jump seat. Attempting to use the front seat in this configuration may compromise safety and increase the risk of injury during an accident.
Do not use the lower LATCH anchors if the combined weight of the child and child restraint exceeds 65 lbs. (29.5 kg). If the combined weight is greater than 65 lbs. (29.5 kg), install the child restraint in your Nissan Frontier using the vehicle seat belt system rather than the lower anchors. Always follow the installation instructions supplied by the child restraint manufacturer.
Follow the procedure below to properly install a rear-facing child restraint on the jump seat of a Nissan Frontier King Cab.
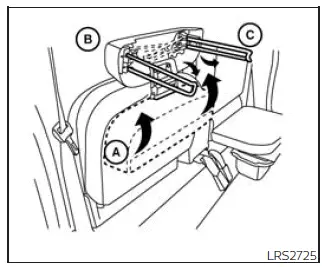
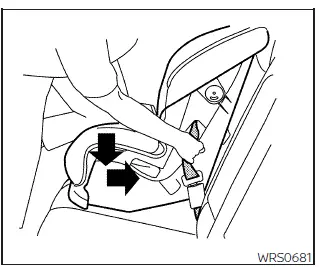
Full open seating position
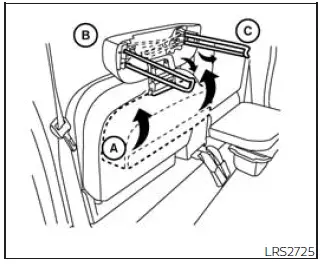
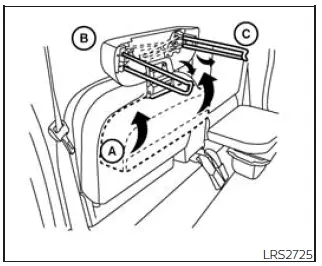
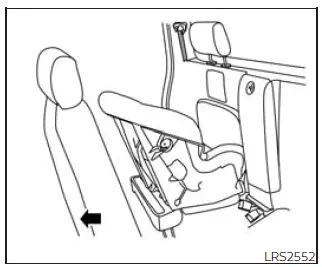
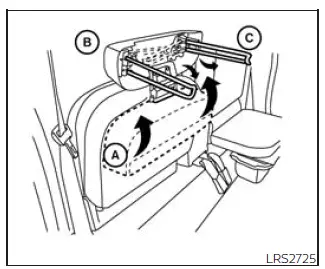
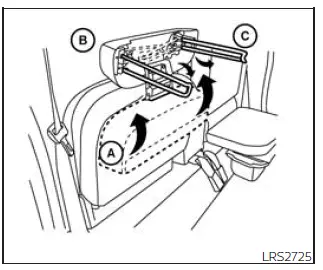
1. To access the passenger-side jump seat extension A, pull upward on the extension handle B and unfold the extension completely. Next, deploy the two support legs C and carefully lower the jump seat into the fully open seating position. Verify that all components are securely locked before proceeding with child restraint installation.
Proper deployment of the jump seat extension is essential to ensure adequate support for the child restraint and to maintain the intended seating geometry within the Nissan Frontier.
Rear-facing - step 2
2. Move the front passenger seat fully forward. Then place the front seatback in the upright position or tilt it forward as required. Position the child restraint on the jump seat. The orientation of the restraint will depend on the design of the child restraint and the size, weight, and age of the child. Always follow the recommendations provided by the child restraint manufacturer.
Creating sufficient space between the front passenger seat and the child restraint is critical for proper installation and safe operation in the Nissan Frontier King Cab.
3. Position the child restraint on the seat.
Ensure that the child restraint sits flat and stable on the jump seat surface. Verify that no part of the restraint interferes with surrounding trim, seat components, or vehicle structures. Always follow the child restraint manufacturer's instructions for positioning and adjustment.
Rear-facing webbing-mounted - step 4
Rear-facing rigid-mounted - step 4
4. Secure the child restraint anchor attachments to the LATCH lower anchors.
Attach both lower connectors of the child restraint to the designated LATCH anchor points. Once connected, inspect each attachment carefully to ensure that it is fully engaged and locked onto the anchor. Improper attachment may reduce the effectiveness of the child restraint during an impact.
Check to make sure the LATCH attachment is properly attached to the lower anchors.
Rear-facing - step 5
5. For child restraints that are equipped with webbing-mounted attachments, remove any additional slack from the anchor attachments. Press downward and rearward firmly in the center of the child restraint with your hand to compress the vehicle seat cushion and seatback while tightening the webbing of the anchor attachments.
Applying pressure while tightening helps eliminate unnecessary movement and allows the child restraint to fit securely against the Nissan Frontier seat structure. Continue tightening until the restraint feels firmly anchored.
Rear-facing - step 6
6. After attaching the child restraint, test it before you place the child in it. Push it from side to side while holding the child restraint near the LATCH attachment path. The child restraint should not move more than 1 inch (25 mm), from side to side. Try to tug it forward and check to see if the LATCH attachment holds the restraint in place. If the restraint is not secure, tighten the LATCH attachment as necessary, or put the restraint in another seat and test it again.
This verification step is extremely important. A correctly installed rear-facing child restraint in the Nissan Frontier should remain stable with very limited movement. If the restraint shifts excessively, repeat the installation procedure until a secure fit is achieved.
You may need to try a different child restraint or install the restraint using the vehicle seat belt system, if permitted by the manufacturer. Not all child restraints are compatible with every vehicle design, and fitment may vary depending on the specific Nissan Frontier configuration.
7. Check to make sure the child restraint is properly secured prior to each use. If the child restraint is loose, repeat steps 1 through 6.
Before every trip, inspect all attachment points, connectors, and adjustment straps to confirm that the child restraint remains securely installed. Performing a quick safety check each time you drive your Nissan Frontier helps provide maximum protection for child passengers and ensures continued compliance with recommended installation practices.
Rear-facing child restraint installation using the seat belts (Crew Cab models) Nissan Frontier 2022
WARNING
The three-point seat belt equipped with an Automatic Locking Retractor (ALR) must always be used when installing a child restraint in a Nissan Frontier.
Failure to activate and use the ALR mode correctly may prevent the child restraint from being securely installed. A loosely installed or improperly secured restraint can shift, tip, or become unstable during a sudden stop or collision, increasing the risk of serious injury or death. Improper installation may also affect the operation of the front passenger air bag system.
Do not use the lower LATCH anchors if the combined weight of the child and child restraint exceeds 65 lbs. (29.5 kg). When the combined weight is greater than 65 lbs. (29.5 kg), install the child restraint in the Nissan Frontier using the vehicle's seat belt system rather than the lower anchors. Always review and follow the installation instructions supplied by the child restraint manufacturer.
Follow the steps below to install a rear-facing child restraint in the rear seating area of a Nissan Frontier Crew Cab using the vehicle seat belts:
Rear-facing - step 1
1. Child restraints designed for infants must always be installed in the rear-facing position and must never be used in the front passenger seat. Place the child restraint on the selected rear seat location and ensure it sits flat against the seat cushion. Always follow the child restraint manufacturer's instructions for positioning and installation.
For maximum protection in the Nissan Frontier, verify that the restraint is suitable for the child's age, height, and weight before beginning installation.
Rear-facing - step 2
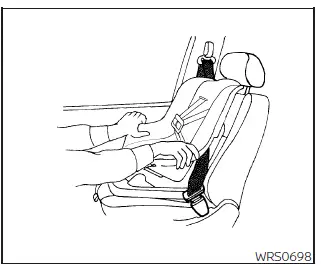
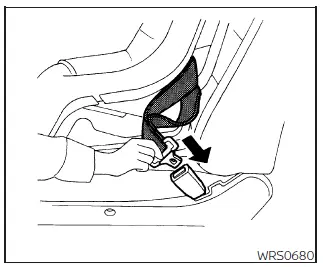
2. Route the seat belt tongue through the designated belt path on the child restraint and insert it into the buckle until you hear and feel it click securely into place. Carefully follow the routing instructions provided by the child restraint manufacturer, as different models may use different belt paths.
Confirm that the belt is not twisted and that it passes smoothly through the restraint before continuing to the next step.
Rear-facing - step 3
3. Pull the shoulder portion of the seat belt slowly and completely out of the retractor. Once fully extended, the retractor switches into ALR mode (child restraint mode). In this mode, the belt can retract but cannot be pulled back out freely. The retractor will automatically return to normal ELR mode after the belt has been fully retracted.
The ALR function is an important safety feature that helps keep the child restraint securely positioned in the Nissan Frontier during normal driving and emergency situations.
Rear-facing - step 4
4. Allow the seat belt to retract gradually while maintaining control of the belt. Pull upward on the shoulder belt to remove excess slack and begin tightening the restraint against the vehicle seat.
As the belt retracts, verify that the restraint remains correctly positioned and that the belt continues to follow the proper routing path.

Rear-facing - step 5
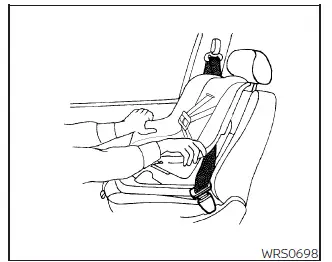
5. Remove any remaining slack from the seat belt by pressing firmly downward and rearward in the center of the child restraint. Compress the vehicle seat cushion and seatback while pulling upward on the shoulder belt. This process helps create a tighter and more secure installation.
Continue applying pressure until the child restraint feels firmly attached to the Nissan Frontier seat and excessive movement has been minimized.
Rear-facing - step 6
6. After securing the child restraint, test the installation before placing the child inside. Hold the restraint near the seat belt path and push it from side to side. The restraint should not move more than 1 inch (25 mm). Pull forward on the restraint and verify that the seat belt continues to hold it securely in place.
If excessive movement is detected, tighten the seat belt further or repeat the installation process. If a secure installation still cannot be achieved, consider trying a different seating position or a different child restraint model. Not all child restraints are compatible with every vehicle configuration, including some Nissan Frontier seating arrangements.
7. Check to make sure that the child restraint is properly secured prior to each use. If the seat belt is not locked, repeat steps 3 through 6.
Before every trip, inspect the child restraint installation and verify that the seat belt remains locked in ALR mode. Regular inspection helps ensure that the restraint continues to provide the highest possible level of protection for young passengers in the Nissan Frontier.
After the child restraint is removed and the seat belt fully retracted, the ALR mode (child restraint mode) is canceled.
Once the belt has completely retracted into the retractor housing, it automatically returns to its normal Emergency Locking Retractor (ELR) operating mode. This restores standard seat belt functionality for everyday passenger use in the Nissan Frontier.
Rear-facing child restraint installation using the seat belts - jump seat (King Cab models) Nissan Frontier D41
WARNING
- The three-point seat belt equipped with an Automatic Locking Retractor (ALR) must always be used when
installing a child restraint in a Nissan Frontier.
Failure to activate the ALR mode correctly may prevent the child restraint from being securely installed. An improperly secured child restraint may tip, shift, or become loose during sudden braking, sharp maneuvers, or a collision. This could result in serious injury to a child and may also affect the intended operation of the front passenger air bag system.
- If a child restraint system is not installed correctly, the child may be exposed to a significantly
increased risk of serious injury or death in a sudden stop or collision.
- Never install a rear-facing child restraint system on the driver's side jump seat of a Nissan Frontier King Cab.
- Do not install a child restraint system on the passenger-side jump seat unless the seat extender has been completely unfolded and positioned correctly.

WARNING
- To install a rear-facing child restraint on the passenger-side jump seat, the front passenger seat must
be moved fully forward and the seatback must be placed in the upright position or tilted forward.
Failure to create adequate clearance may prevent proper installation of the child restraint and could
lead to serious injury or death during a collision.
- The front passenger seat must not be occupied while a rear-facing child restraint is installed on the jump seat. Attempting to use the front seat in this configuration may compromise safety and increase the likelihood of injury in an accident.
Do not use the lower LATCH anchors if the combined weight of the child and the child restraint exceeds 65 lbs. (29.5 kg). If the combined weight of the child and child restraint is greater than 65 lbs. (29.5 kg), install the restraint using the Nissan Frontier seat belt system rather than the lower anchors. Always follow the child restraint manufacturer's instructions and recommendations.
Follow the procedure below to install a rear-facing child restraint on the passenger-side jump seat of a Nissan Frontier King Cab.
Full open seating position
1. To access the jump seat extension A on the passenger-side jump seat, pull upward on extension handle B and unfold the extension completely into the open position. Next, deploy the two support legs C and carefully lower the jump seat until it reaches the fully opened seating position.
Before proceeding, verify that the seat extender and support legs are fully engaged and stable. Proper deployment of the jump seat assembly is essential for safe child restraint installation in the Nissan Frontier.
Rear-facing - step 2
2. Move the front passenger seat completely forward. Then place the front seatback in the upright position or tilt it forward as required. Position the rear-facing child restraint on the jump seat and verify that it sits flat against the seating surface. The correct orientation and positioning of the restraint will depend on the specific child restraint model and the size of the child.
Always follow the instructions supplied by the child restraint manufacturer. Ensure that no part of the child restraint interferes with surrounding vehicle components and that sufficient clearance exists between the restraint and the front passenger seat. Proper positioning is critical to achieving a secure installation and maximizing child passenger safety in the Nissan Frontier.
2. Move the front passenger seat completely forward. Then adjust the front seatback to the upright position or tilt it forward as required. Carefully place the child restraint on the jump seat. The correct orientation of the child restraint will depend on the specific restraint design as well as the child's age, height, and weight. Always follow the installation instructions supplied by the child restraint manufacturer when configuring the seating arrangement in your Nissan Frontier.
Before continuing, verify that the child restraint sits securely on the jump seat surface and that there is adequate clearance between the restraint and the front passenger seat. Proper positioning is essential for achieving a safe and secure installation in Nissan Frontier King Cab models.
Rear-facing - step 3
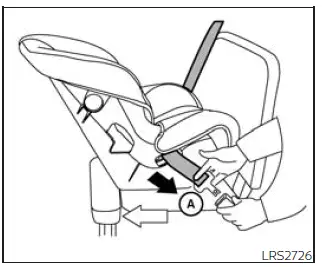
3. Route the seat belt tongue through the designated belt path on the child restraint and insert it into the buckle until you hear and feel the latch engage A.
Always follow the belt-routing instructions provided by the child restraint manufacturer. Different child restraint designs may require specific routing methods to ensure maximum safety and stability. Verify that the seat belt lies flat and is not twisted anywhere along the installation path.
Rear-facing - step 4
4. Pull the shoulder belt outward until it is fully extended B. At this point, the seat belt retractor switches into Automatic Locking Retractor (ALR) mode, also known as child restraint mode. This special locking mode is designed to help keep the child restraint securely fastened during vehicle operation.
The retractor will automatically return to Emergency Locking Retractor (ELR) mode once the seat belt has been completely retracted after removal of the child restraint. Correct activation of ALR mode is a critical step when installing a child restraint in a Nissan Frontier.
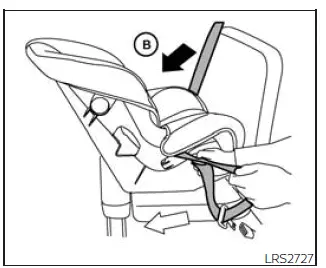
Rear-facing - step 5
5. Allow the seat belt to retract gradually. While the belt retracts, pull upward on the shoulder belt C to eliminate any slack remaining in the system.
As the belt tightens, ensure that the child restraint remains properly positioned and does not shift on the seat. Removing excess slack is essential for creating a secure installation and improving child passenger protection.
Rear-facing - step 6
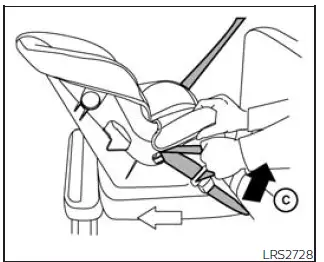
6. Remove any additional slack from the seat belt by pressing firmly downward and rearward in the center of the child restraint. Compress the vehicle seat cushion and seatback while pulling upward on the seat belt to achieve the tightest possible installation.
Applying pressure during this step helps secure the child restraint firmly against the Nissan Frontier seat structure and minimizes unwanted movement during driving or emergency situations.
Rear-facing - step 7
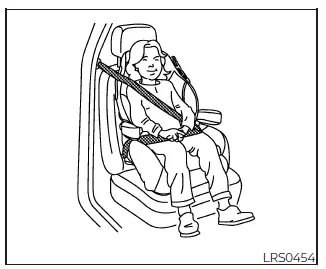
7. After attaching the child restraint, test it thoroughly before placing the child inside. Hold the restraint near the seat belt path and push it from side to side. The child restraint should not move more than 1 inch (25 mm) in either direction. Pull forward on the restraint and verify that the seat belt continues to hold it securely in place.
If the restraint is not secure, tighten the seat belt further and repeat the inspection. If necessary, try a different seating position or a different child restraint model. Not every child restraint is compatible with every vehicle configuration, including some Nissan Frontier seating arrangements.
Taking a few extra moments to confirm a secure installation can significantly improve safety for young passengers and help ensure proper performance of the restraint system.
8. Check to make sure that the child restraint is properly secured prior to each use. If the seat belt is not locked, repeat steps 3 through 7.
Before every trip, inspect the installation to confirm that the seat belt remains locked in ALR mode and that the child restraint has not loosened. Regular inspection is an important part of maintaining child passenger safety in your Nissan Frontier.
After the child restraint is removed and the seat belt fully retracted, the ALR mode (child restraint mode) is canceled.
Once the seat belt retracts completely into the retractor housing, the system automatically returns to its normal ELR operating mode. This restores standard seat belt functionality for everyday passenger use while ensuring that the Nissan Frontier restraint system remains ready for future child restraint installations.
Forward-facing child restraint installation using LATCH (Crew Cab models) Nissan Frontier third generation
Basic information
Do not use the lower LATCH anchors if the combined weight of the child and the child restraint exceeds 65 lbs. (29.5 kg). When the combined weight is greater than 65 lbs. (29.5 kg), the child restraint in your Nissan Frontier must be installed using the vehicle's seat belt system rather than the lower anchors. Always follow the installation instructions supplied by the child restraint manufacturer and verify all weight limitations before installation.
Follow the procedure below to install a forward-facing child restraint in the rear seating area of a Nissan Frontier Crew Cab using the LATCH (Lower Anchors and Tethers for Children) system:
1. Position the child restraint on the seat.
Place the forward-facing child restraint securely on the selected rear seating position. Make sure the restraint sits flat against the seat cushion and seatback. Always review and follow the child restraint manufacturer's instructions before beginning installation.
Forward-facing webbing-mounted -
step 2
Forward-facing rigid-mounted - step 2
2. Secure the child restraint anchor attachments to the LATCH lower anchors.
Attach the lower connectors of the child restraint to the designated LATCH anchor points in the Nissan Frontier. After connecting both attachments, verify that they are fully engaged and locked securely onto the anchors.
Check to make sure the LATCH attachment is properly attached to the lower anchors.
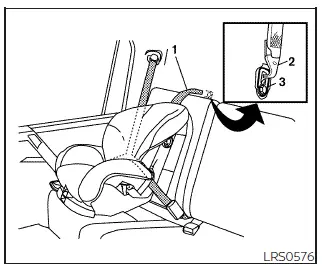
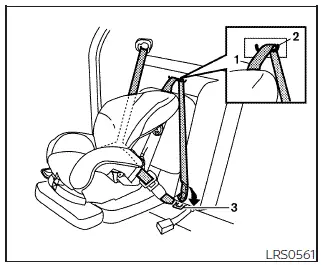
If the child restraint is equipped with a top tether strap, route the top tether strap and secure the tether strap to the tether anchor point.
The top tether strap provides additional restraint stability and helps reduce forward movement during a collision. Always follow the tether routing instructions supplied by the child restraint manufacturer.
Do not install child restraints that require the use of a top tether strap in seating positions that do not have a top tether anchor.
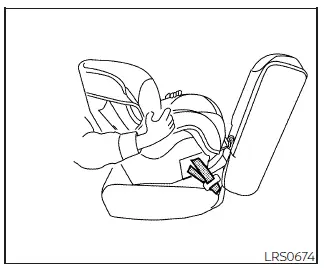
3. The back of the child restraint should be secured against the vehicle seatback.
If necessary, adjust or remove the head restraint/headrest to obtain the correct child restraint fit. If the head restraint/ headrest is removed, store it in a secure place. Be sure to reinstall the head restraint/headrest when the child restraint is removed.
If the seating position does not have an adjustable head restraint/headrest and it is interfering with the proper child restraint fit, try another seating position or a different child restraint.
For optimal safety in the Nissan Frontier, ensure that the rear surface of the child restraint maintains full contact with the seatback whenever possible.
Forward-facing - step 4
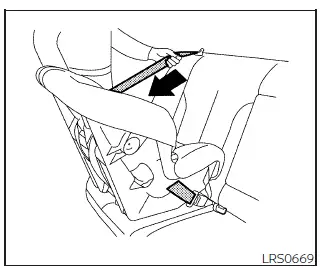
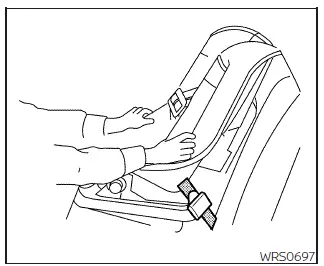
4. For child restraints that are equipped with webbing-mounted attachments, remove any additional slack from the anchor attachments. Press downward and rearward firmly in the center of the child restraint with your knee to compress the vehicle seat cushion and seatback while tightening the webbing of the anchor attachments.
Applying pressure while tightening helps create a firm connection between the child restraint and the Nissan Frontier seat structure, reducing movement and improving overall installation security.
5. Tighten the tether strap according to the manufacturer's instructions to remove any slack.
Continue tightening until the tether strap is secure and properly tensioned. Avoid overtightening beyond the manufacturer's recommendations.
Forward-facing - step 6
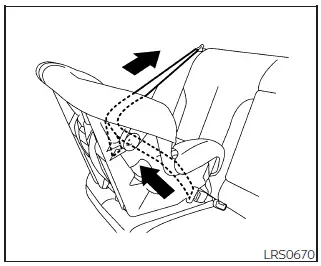
6. After attaching the child restraint, test it before you place the child in it. Push it from side to side while holding the child restraint near the LATCH attachment path. The child restraint should not move more than 1 inch (25 mm), from side to side. Try to tug it forward and check to see if the LATCH attachment holds the restraint in place. If the restraint is not secure, tighten the LATCH attachment as necessary, or put the restraint in another seat and test it again.
A correctly installed child restraint should remain stable with minimal movement. If excessive movement is detected, repeat the installation procedure or consult the child restraint manufacturer for additional guidance.
You may need to try a different child restraint. Not all child restraints fit in all types of vehicles.
Different child restraint designs vary in shape and dimensions. For this reason, some models may fit better in certain Nissan Frontier seating positions than others.
7. Check to make sure the child restraint is properly secured prior to each use. If the child restraint is loose, repeat steps 3 through 6.
Before every trip, inspect all anchor connections and tether attachments to ensure that the child restraint remains securely installed. Routine checks can help maintain the highest level of child passenger protection.
Anchor point access
- Pull strap
- Anchor points
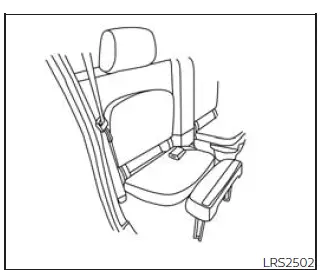
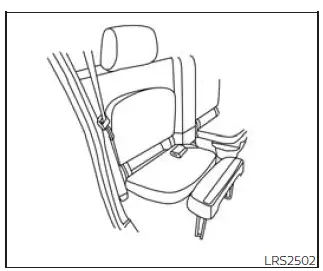
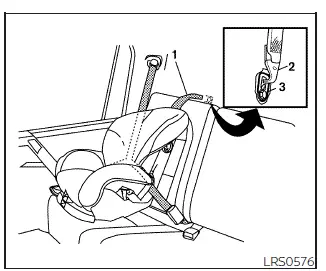
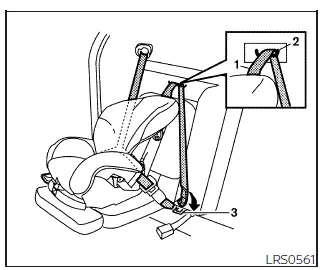
Installing top tether strap (rear bench seat for Crew Cab models)
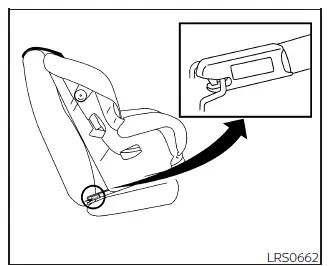
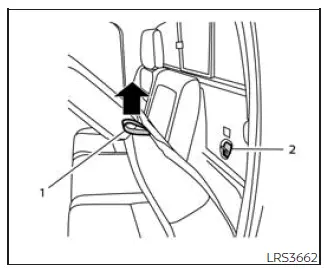
To gain access to the tether anchor points behind the rear bench seat, tilt the rear seatback forward by pulling upward on the release strap located behind the seatback.
The Nissan Frontier provides dedicated tether anchor locations designed specifically for compatible forward-facing child restraints.
Rear bench seat (Crew Cab models)
- Top tether strap
- Tether strap
- Tether anchor point
Before securing the child restraint with the LATCH lower anchors (rear outboard seating positions for Crew Cab models) follow these steps.
1. If necessary, raise or remove the head restraint/headrest to position the top tether strap as shown. If the head restraint/headrest is removed, store it in a secure place. Be sure to reinstall the head restraint/headrest when the child restraint is removed.
2. Position the top tether strap as shown.
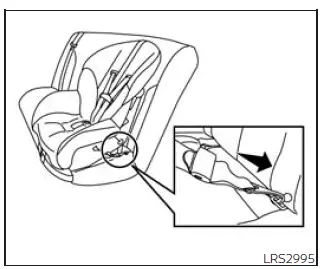
Ensure that the tether strap is routed correctly and is not twisted, pinched, or obstructed by any vehicle component.
3. Secure the tether strap to the tether anchor point as shown.
Verify that the attachment hook is fully engaged with the tether anchor point before proceeding.
4. Return the seatback to the locked position.
Make sure the seatback is securely latched before transporting passengers.
5. Refer back to child restraint installation steps before tightening the tether strap.
Once the installation process is complete, perform a final inspection to confirm that the child restraint is securely attached and that all LATCH and tether connections are properly tightened.
If you have any questions when installing a top tether strap, it is recommended that you visit a NISSAN dealer for this service.
Forward-facing child restraint installation using LATCH - jump seat (King Cab models) Nissan Frontier SUV
Basic information
WARNING
- If a child restraint system is not installed correctly, a child may be exposed to a significantly
increased risk of serious injury or death during a sudden stop, emergency maneuver, or collision.
- Do not install a child restraint system on the passenger-side jump seat unless the seat extender has been fully unfolded and properly secured.
- For forward-facing child restraints and booster seats, DO NOT install the restraint if the base extends beyond the front edge of the driver's-side seat cushion. Improper support may reduce stability and affect child restraint performance.
Do not use the lower LATCH anchors if the combined weight of the child and child restraint exceeds 65 lbs. (29.5 kg). When the total combined weight is greater than 65 lbs. (29.5 kg), install the child restraint in your Nissan Frontier using the vehicle seat belt system instead of the lower anchors. Always follow the child restraint manufacturer's installation instructions and weight recommendations.
Follow the procedure below to install a forward-facing child restraint on the jump seat of a Nissan Frontier King Cab.
Full open seating position
1. To access the jump seat extension (passenger's side only) A on the jump seat, pull upward on extension handle B and unfold the extension into its open position. Next, deploy the two support legs C and lower the jump seat until it reaches the fully open seating position.
Before continuing, confirm that the extension and support legs are completely deployed and securely locked. Proper setup of the jump seat is essential for safe child restraint installation in the Nissan Frontier.
2. Position the child restraint on the seat.
Place the forward-facing child restraint squarely on the jump seat and verify that it rests flat against the seating surface. Always follow the child restraint manufacturer's instructions regarding positioning, harness adjustment, and installation procedures.
Proper placement helps ensure maximum stability and allows the restraint system to perform as intended during vehicle operation.
Forward-facing webbing-mounted -
step 3
Forward-facing rigid-mounted - step 3
3. Secure the child restraint anchor attachments to the LATCH lower anchors.
Attach both lower connectors of the child restraint to the designated LATCH anchor points in the Nissan Frontier. After connection, verify that each attachment is fully engaged and securely locked onto the anchors.
Check to make sure the LATCH attachment is properly attached to the lower anchors.
If the child restraint is equipped with a top tether strap, route the top tether strap and secure the tether strap to the tether anchor point. Do not install child restraints that require the use of a top tether strap in seating positions that do not have a top tether anchor.
The top tether strap plays an important role in reducing forward movement of the child restraint during a collision. Always route and secure the tether exactly as specified by the restraint manufacturer.
4. The back of the child restraint should be secured against the vehicle seatback.
If necessary, adjust or remove the head restraint/headrest to obtain the correct child restraint fit. If the head restraint/ headrest is removed, store it in a secure place. Be sure to reinstall the head restraint/headrest when the child restraint is removed.
If the seating position does not have an adjustable head restraint/headrest and it is interfering with the proper child restraint fit, try another seating position or a different child restraint.
For optimal safety in the Nissan Frontier, ensure that the rear surface of the child restraint remains firmly against the seatback whenever possible.
Forward-facing - step 5
5. For child restraints that are equipped with webbing-mounted attachments, remove any additional slack from the anchor attachments. Press downward and rearward firmly in the center of the child restraint with your knee to compress the vehicle seat cushion and seatback while tightening the webbing of the anchor attachments.
Applying pressure while tightening helps eliminate excess movement and creates a stronger connection between the child restraint and the Nissan Frontier seat structure.
6. Tighten the tether strap according to the manufacturer's instructions to remove any slack.
Continue tightening until the tether strap is properly tensioned. Avoid excessive force beyond the manufacturer's recommendations.
Forward-facing - step 7
7. After attaching the child restraint, test it before you place the child in it. Push it from side to side while holding the child restraint near the LATCH attachment path. The child restraint should not move more than 1 inch (25 mm), from side to side. Try to tug it forward and check to see if the LATCH attachment holds the restraint in place. If the restraint is not secure, tighten the LATCH attachment as necessary, or put the restraint in another seat and test it again. You may need to try a different child restraint. Not all child restraints fit in all types of vehicles.
A correctly installed child restraint should remain stable with very limited movement. If excessive movement is detected, repeat the installation process and inspect all anchor connections carefully.
8. Check to make sure the child restraint is properly secured prior to each use. If the child restraint is loose, repeat steps 1 through 7.
Before every trip, inspect the LATCH attachments and tether strap to confirm that the child restraint remains securely installed in your Nissan Frontier.
Jump seat (King Cab models)
- Top tether strap
- Routing bracket
- Tether anchor point
Installing top tether strap - jump seat (King Cab models)
WARNING
- Do not secure the top tether strap to the routing bracket. The routing bracket is only intended to guide the tether strap. If the child restraint is not anchored to the correct tether anchor point, the risk of serious injury or death during a collision or sudden stop increases significantly.
- Child restraint anchorages are designed exclusively for properly installed child restraint systems.
Under no circumstances should these anchorages be used to secure adult seat belts, cargo restraints, harnesses, or other vehicle equipment. Misuse can damage the anchorage system, resulting in improper child restraint installation and increased injury risk during an accident.
The child restraint top tether strap must be used when installing the child restraint with LATCH lower anchor attachments.
The top tether helps improve overall restraint stability and is an important part of the child restraint installation process in Nissan Frontier King Cab models.
First, secure the child restraint with the LATCH lower anchors (rear seating positions).
1. Pull the cover plate off to access the top tether strap routing bracket for the jump seat.
2. Route the top tether strap through the routing bracket.
Ensure that the strap passes smoothly through the routing bracket without twists or obstructions.
3. Secure the top tether strap to the tether anchor point as shown.
Verify that the tether hook is fully engaged with the designated tether anchor point.
4. Refer back to child restraint installation steps before tightening the tether strap.
After all attachment points have been connected, perform a final inspection and tighten the tether strap according to the manufacturer's instructions.
If you have any questions when installing a top tether strap, it is recommended that you visit a NISSAN dealer for this service.
Forward-facing child restraint installation using the seat belts - front passenger and rear bench seat (Crew Cab models) Nissan Frontier third generation
Basic information
WARNING
The three-point seat belt equipped with an Automatic Locking Retractor (ALR) must always be used when installing a child restraint.
Failure to activate the ALR mode properly may prevent the child restraint from being securely installed. An improperly secured restraint may shift, loosen, or tip during sudden braking, emergency maneuvers, or a collision, potentially resulting in serious injury to a child. Incorrect installation may also affect the operation of the front passenger air bag system in your Nissan Frontier.
Forward-facing (front passenger seat) -
step 1
Do not use the lower LATCH anchors if the combined weight of the child and child restraint exceeds 65 lbs. (29.5 kg). When the combined weight is greater than 65 lbs. (29.5 kg), install the child restraint using the Nissan Frontier seat belt system instead of the lower anchors. Always verify the applicable weight limits and carefully follow the child restraint manufacturer's instructions.
Follow the procedure below to install a forward-facing child restraint using the vehicle seat belt system in the rear bench seat (Crew Cab models) or, when necessary, in the front passenger seat of the Nissan Frontier.
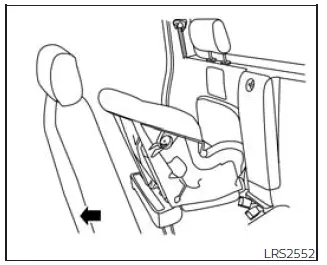
1. If you must install a child restraint in the front seat, it should be placed in a forward-facing direction only. Move the seat to the rearmost position.
Positioning the seat as far rearward as possible helps maximize the distance between the child restraint and the front passenger air bag.
Child restraints for infants must be used in the rear-facing direction and therefore must not be used in the front seat.
2. Position the child restraint on the seat.
Always follow the child restraint manufacturer's instructions.
Place the child restraint firmly against the vehicle seat and ensure it rests evenly on the seat cushion.
The back of the child restraint should be secured against the vehicle seatback.
If necessary, adjust or remove the head restraint/headrest to obtain the correct child restraint fit. If the head restraint/ headrest is removed, store it in a secure place. Be sure to reinstall the head restraint/headrest when the child restraint is removed.
If the seating position does not have an adjustable head restraint/headrest and it is interfering with the proper child restraint fit, try another seating position or a different child restraint.
For the best fit in the Nissan Frontier, ensure that the child restraint maintains full contact with the seatback and does not rock excessively.
Forward-facing - step 3
3. Route the seat belt tongue through the child restraint and insert it into the buckle until you hear and feel the latch engage. Be sure to follow the child restraint manufacturer's instructions for belt routing.
Confirm that the seat belt follows the correct belt path and is not twisted before continuing.
If the child restraint is equipped with a top tether strap, route the top tether strap and secure the tether strap to the tether anchor point (rear seat installation only).
The top tether strap provides additional stability and helps reduce forward movement of the child restraint during a collision.
Do not install child restraints that require the use of a top tether strap in seating positions that do not have a top tether anchor.
Forward-facing - step 4
4. Pull the shoulder belt until the belt is fully extended. At this time, the seat belt retractor is in the ALR mode (child restraint mode). It reverts to ELR mode when the seat belt is fully retracted.
The ALR feature is specifically designed to keep the child restraint tightly secured and is a critical part of the installation process in the Nissan Frontier.
Forward-facing - step 5
5. Allow the seat belt to retract. Pull up on the shoulder belt to remove any slack in the belt.
Continue removing slack until the belt is snug and the child restraint is firmly held against the vehicle seat.
Forward-facing - step 6
6. Remove any additional slack from the seat belt; press downward and rearward firmly in the center of the child restraint with your knee to compress the vehicle seat cushion and seatback while pulling up on the seat belt.
Applying pressure during tightening helps create a secure connection between the child restraint and the Nissan Frontier seat structure.
7. Tighten the tether strap according to the manufacturer's instructions to remove any slack.
Verify that the tether strap is routed correctly and tightened according to the restraint manufacturer's recommendations.
Forward-facing - step 8
8. After attaching the child restraint, test it before you place the child in it. Push it from side to side while holding the child restraint near the seat belt path. The child restraint should not move more than 1 inch (25 mm), from side to side. Try to tug it forward and check to see if the seat belt holds the restraint in place. If the restraint is not secure, tighten the seat belt as necessary, or put the restraint in another seat and test it again.
A correctly installed child restraint should remain stable with minimal movement. If excessive movement is detected, repeat the installation procedure or consider a different child restraint model.
You may need to try a different child restraint. Not all child restraints fit in all types of vehicles.
Because child restraint designs vary significantly, fitment may differ between seating positions in the Nissan Frontier.
9. Check to make sure the child restraint is properly secured prior to each use. If the seat belt is not locked, repeat steps 3 through 8.
Routine inspection before every trip helps ensure continued protection and proper operation of the child restraint system.
Forward-facing - step 10
10. If the child restraint is installed in the
front passenger seat, place the ignition
switch in the ON position. The front
passenger air bag status light
 should illuminate. If this light is not illuminated,
see "Front passenger air bag
and status light". Move the child
restraint to another seating position.
should illuminate. If this light is not illuminated,
see "Front passenger air bag
and status light". Move the child
restraint to another seating position.
The illuminated status light confirms that the passenger air bag system is responding appropriately to the installed child restraint.
Have the system checked. It is recommended that you visit a NISSAN dealer for this service.
After the child restraint is removed and the seat belt is fully retracted, the ALR mode (child restraint mode) is canceled.
Once the seat belt retracts completely, the Nissan Frontier restraint system automatically returns to normal ELR operation for standard passenger use.
Anchor point access
- Pull strap
- Anchor points
Installing top tether strap (rear bench seat for Crew Cab models)
To access the anchor points behind the rear bench seat, tilt the rear seatback forward by lifting up on the pull strap behind the seatback.
The Nissan Frontier provides dedicated tether anchor locations designed specifically for compatible forward-facing child restraints.
Rear bench seat (Crew Cab models)
- Top tether strap
- Tether strap
- Tether anchor point
The child restraint top tether strap must be used when installing the child restraint with the seat belts.
Using the tether strap helps improve restraint stability and enhances overall child passenger protection.
First, secure the child restraint with the seat belt.
1. If necessary, raise or remove the head restraint/headrest to position the top tether strap as shown. If the head restraint/headrest is removed, store it in a secure place. Be sure to reinstall the head restraint/headrest when the child restraint is removed.
2. Position the top tether strap as shown.
Ensure that the tether strap is routed correctly and remains free of twists.
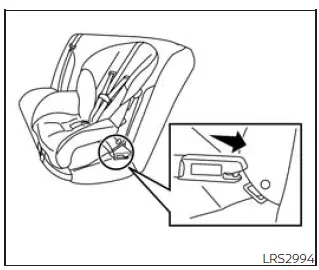
3. Secure the tether strap to the tether anchor point as shown.
Verify that the tether hook is fully engaged with the designated anchor point.
4. Return the seatback to the locked position.
Confirm that the seatback is securely latched before transporting passengers.
5. Refer back to child restraint installation steps before tightening the tether strap.
Perform a final inspection to confirm that all seat belt and tether connections are secure before placing the child in the restraint.
If you have any questions when installing a top tether strap, it is recommended that you visit a NISSAN dealer for this service.
Forward-facing child restraint installation using the seat belts - front passenger and jump seats (King Cab models) Nissan Frontier D41
Basic information
WARNING
- The three-point seat belt equipped with an Automatic Locking Retractor (ALR) must always be used when
installing a child restraint.
Failure to activate the ALR mode correctly can prevent the child restraint from being securely installed. A restraint that is loose or improperly secured may shift, tip, or move during a sudden stop, emergency maneuver, or collision, increasing the risk of serious injury to a child. Incorrect installation may also affect the operation of the front passenger air bag system in your Nissan Frontier.
- If a child restraint system is not installed correctly, a child may suffer serious injury or death during
an accident.
- Do not install a child restraint system on the passenger-side jump seat unless the seat extender has been completely unfolded and properly positioned.
- For forward-facing child restraints and booster seats, DO NOT install the restraint if the base extends beyond the front edge of the driver's-side seat cushion. Proper support of the restraint base is essential for safe operation.
Do not use the lower LATCH anchors if the combined weight of the child and child restraint exceeds 65 lbs. (29.5 kg). If the total combined weight is greater than 65 lbs. (29.5 kg), install the child restraint using the Nissan Frontier seat belt system rather than the lower anchors. Always follow the installation procedures provided by the child restraint manufacturer.
Follow the steps below to install a forward-facing child restraint using the vehicle seat belt system in the jump seats of Nissan Frontier King Cab models or, when necessary, in the front passenger seat.
Forward-facing (front passenger seat) -
step 1
1. If you must install a child restraint in the front seat, it should be placed in a forward-facing direction only. Move the seat to the rearmost position.
Positioning the front passenger seat as far rearward as possible helps maximize the distance between the child restraint and the front passenger air bag.
Child restraints for infants must be used in the rear-facing direction and therefore must not be used in the front seat.
Forward-facing (jump seat for King
Cab models) - step 2
Full open seating position
2. To access the jump seat extension (passenger's side only) A on the jump seat, pull up B on the extension to unfold it to the open position. Then unfold the two support legs C and lower the jump seat to the full open seating position.
Before proceeding, verify that the extension and support legs are fully deployed and securely locked. Proper preparation of the jump seat is necessary for safe child restraint installation in the Nissan Frontier.
Forward-facing - step 3
3. Position the child restraint on the seat.
Always follow the child restraint manufacturer's instructions.
Place the restraint firmly on the seat cushion and ensure it sits level and stable before continuing.
The back of the child restraint should be secured against the vehicle seatback.
If necessary, adjust or remove the head restraint/headrest to obtain the correct child restraint fit. If the head restraint/ headrest is removed, store it in a secure place. Be sure to reinstall the head restraint/headrest when the child restraint is removed.
If the seating position does not have an adjustable head restraint/headrest and it is interfering with the proper child restraint fit, try another seating position or a different child restraint.
For the best fit in the Nissan Frontier, the rear surface of the child restraint should remain in full contact with the seatback whenever possible.
Forward-facing - step 4
4. Route the seat belt tongue through the child restraint and insert it into the buckle until you hear and feel the latch engage. Be sure to follow the child restraint manufacturer's instructions for belt routing.
Verify that the belt follows the correct routing path and is not twisted before moving to the next step.
If the child restraint is equipped with a top tether strap, route the top tether strap and secure the tether strap to the tether anchor point.
Using the tether strap improves restraint stability and helps reduce forward movement during a collision.
Donot install child restraints that require the use of a top tether strap to seating positions that do not have a top tether anchor.
Forward-facing - step 5
5. Pull the shoulder belt until the belt is fully extended. At this time, the seat belt retractor is in the ALR mode (child restraint mode). It reverts to the ELR mode when the seat belt is fully retracted.
The Automatic Locking Retractor is designed to keep the child restraint tightly secured and is an important part of the installation process in the Nissan Frontier.
Forward-facing - step 6
6. Allow the seat belt to retract. Pull up on the shoulder belt to remove any slack in the belt.
Continue tightening until the seat belt fits snugly and the child restraint remains firmly positioned.
Forward-facing - step 7
7. Remove any additional slack from the seat belt; press downward and rearward firmly in the center of the child restraint with your knee to compress the vehicle seat cushion and seatback while pulling up on the seat belt.
Applying firm pressure while tightening helps create a secure connection between the child restraint and the Nissan Frontier seat structure.
8. Tighten the tether strap according to the manufacturer's instructions to remove any slack.
Ensure that the tether strap is routed correctly and tightened to the manufacturer's specifications.
Forward-facing - step 9
9. After attaching the child restraint, test it before you place the child in it. Push it from side to side while holding the seat near the seat belt path. The child restraint should not move more than 1 inch (25 mm) from side to side. Try to tug it forward and check to see if the belt holds the restraint in place. If the restraint is not secure, tighten the belt as necessary, or put the restraint in another seat and test it again. You may need to try a different child restraint. Not all child restraints fit in all types of vehicles.
A properly installed child restraint should remain stable with minimal movement. If excessive movement is detected, repeat the installation process until a secure fit is achieved.
10. Check to make sure that the child restraint is properly secured prior to each use. If the seat belt is not locked, repeat steps 3 through 9.
Inspect the installation before every trip to ensure continued safety for child passengers in your Nissan Frontier.
Forward-facing - step 11
11. If the child restraint is installed in the
front passenger seat, place the ignition
switch in the ON position. The front passenger
air bag status light
 should
illuminate. If this light is not illuminated,
see "Front passenger air bag and status
light". Move the child restraint to
another seating position. Have the
system checked. It is recommended
that you visit a NISSAN dealer for this
service.
should
illuminate. If this light is not illuminated,
see "Front passenger air bag and status
light". Move the child restraint to
another seating position. Have the
system checked. It is recommended
that you visit a NISSAN dealer for this
service.
The illuminated status light confirms that the vehicle has correctly recognized the seating condition and child restraint installation.
After the child restraint is removed and the seat belt is fully retracted, the ALR mode (child restraint mode) is canceled.
Once fully retracted, the Nissan Frontier seat belt system automatically returns to normal ELR operation for everyday passenger use.
Jump seat (King Cab models)
- Top tether strap
- Routing bracket
- Tether anchor point
Installing top tether strap - jump seat (King Cab models)
WARNING
- Do not secure the top tether strap to the routing bracket. If the child restraint is not anchored properly, the risk of a child being injured or killed in a collision or a sudden stop greatly increases.
- Child restraint anchorages are designed
to withstand only those loads
imposed by correctly fitted child restraints.
Under no circumstances are they to be used to attach adult seat belts, cargo restraints, or other equipment to the vehicle. Misuse may damage the anchorages and prevent proper child restraint installation, increasing the risk of serious injury or death during a collision.
The child restraint top tether strap must be used when installing the child restraint with the seat belts.
Using the top tether strap enhances stability and improves overall restraint performance during an impact.
First, secure the child restraint with the seat belt.
1. Pull the cover plate off to access the top tether strap routing bracket for the jump seat.
2. Route the top tether strap through the routing bracket.
Ensure that the tether strap is routed smoothly and remains free of twists.
3. Secure the top tether strap to the tether anchor point as shown.
Confirm that the tether hook is fully engaged with the anchor point before tightening.
4. Refer back to child restraint installation steps before tightening the tether strap.
Perform a final inspection and tighten the tether according to the manufacturer's instructions.
If you have any questions when installing a top tether strap, it is recommended that you visit a NISSAN dealer for this service.
Booster Seats for Nissan Frontier Nissan Frontier 2026
Basic Information
When installing a booster seat in your Nissan Frontier, it is important to carefully follow all recommended installation procedures and safety guidelines. Proper booster seat use helps provide enhanced protection for growing children and supports correct seat belt positioning during everyday travel.
Important Precautions for Booster Seats
WARNING
Improper use of a booster seat or seat belt can significantly increase the risk of serious injury or death to a child during sudden braking, evasive maneuvers, or a collision. Always ensure the booster seat is installed and used exactly as intended.
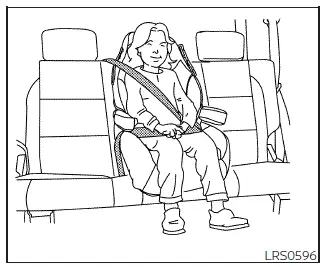
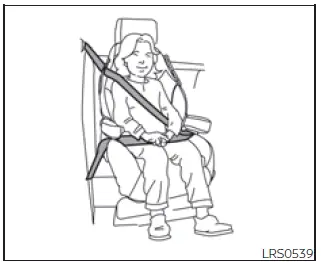
- Verify that the shoulder belt rests comfortably across the child's shoulder and chest, avoiding contact with the face or neck, while the lap belt remains low across the hips and never over the abdomen.
- Never allow the shoulder belt to be routed behind the child's back or underneath the child's arm.
- A booster seat must only be used in a seating position equipped with both a lap and shoulder seat belt.
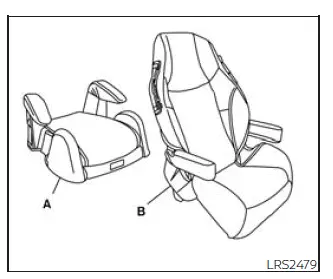
- Low back booster seat
- High back booster seat
Booster seats are available in a variety of sizes, designs, and configurations from multiple manufacturers. When choosing the most suitable booster seat for your Nissan Frontier, consider the following recommendations:
- Select only a booster seat that carries certification showing compliance with Federal Motor Vehicle Safety Standard 213 or Canadian Motor Vehicle Safety Standard 213.
- Test the booster seat inside your Nissan Frontier to confirm compatibility with the vehicle's seating surfaces and seat belt system.
- Ensure the child's head receives proper support from either the booster seat or the vehicle seatback. The vehicle seatback should reach at least the midpoint of the child's ears. If a low-back booster does not provide adequate support due to seatback height, choose a high-back booster seat instead.
- After placing the child in the booster seat, carefully verify all adjustments and belt routing. Confirm that the booster seat fits both the child and the vehicle correctly before every trip. Always follow all manufacturer recommendations.
All U.S. states and Canadian provinces and territories require infants and young children to be properly secured in an approved child restraint system whenever a vehicle is in operation.
The installation procedures described in this section apply to booster seat installation in the rear seating positions as well as the front passenger seat of the Nissan Frontier when appropriate.
Booster Seat Installation – Front Passenger Seat (All Models) and Rear Seat (Crew Cab Models)
WARNING
To reduce the possibility of injury, never place the seat belt into Automatic Locking Retractor (ALR) mode when using a booster seat together with the vehicle seat belt system.
Follow these steps to properly install a booster seat in the rear seating area or front passenger seat of your Nissan Frontier:
1. If installation in the front passenger seat is unavoidable, move the front passenger seat completely rearward to maximize the distance from the front air bag.
Front passenger position
Rear center position

Rear outboard position
2. Place the booster seat securely on the vehicle seat.
Always install the booster seat facing forward.
Carefully follow the instructions provided by the booster seat manufacturer.
3. Verify that the booster seat sits flat and stable on the Nissan Frontier seat cushion.
If necessary, adjust or remove the head restraint/headrest to achieve the correct fit. Any removed head restraint/headrest should be stored securely and reinstalled when the booster seat is no longer being used.
If the seating position lacks an adjustable head restraint/headrest or if it interferes with proper installation, select another seating location or use a different booster seat model.
4. Position the lap belt low across the child's hips so that it fits snugly and comfortably. Follow the booster seat manufacturer's belt-routing instructions.
5. Pull the shoulder belt toward the retractor to remove excess slack. The shoulder belt should cross the center of the child's shoulder and upper chest. Follow all booster seat routing recommendations.
6. Refer to the instructions and safety information provided in the "Three-point type seat belt with retractor" section to ensure the seat belt is fastened correctly.
7. If the booster seat is installed in the front passenger seat, turn the ignition switch to the
ON position. The front passenger air bag status indicator
 may or may not illuminate depending on the
child's size and the specific booster seat being used.
may or may not illuminate depending on the
child's size and the specific booster seat being used.
Booster Seat Installation – Jump Seat (King Cab Models)
WARNING
- If a child restraint system is not installed correctly, a child may suffer severe injury or death during
a sudden stop or crash.
- For booster seats, do not use the seating position if the child restraint base extends beyond the front edge of the seat cushion.
- Never install a child restraint on the passenger-side jump seat without first unfolding the seat extension.
- Do not engage Automatic Locking Retractor (ALR) mode when using a booster seat with the Nissan Frontier seat belt system.
Follow these procedures to install a booster seat on the jump seats of King Cab Nissan Frontier models:
1. To access the passenger-side jump seat extension (A), pull upward on the extension release (B) and unfold it completely. Then unfold both support legs (C) and lower the jump seat into its fully deployed seating position.
2. Position the booster seat securely on the jump seat.
The booster seat must always face forward.
Follow all instructions supplied by the booster seat manufacturer.
3. Ensure the booster seat remains stable and properly supported on the vehicle seat.
If needed, adjust or temporarily remove the head restraint/headrest to obtain the best fit. Store any removed components safely and reinstall them after the booster seat is removed.
If proper installation cannot be achieved because of seat design or head restraint interference, use another seating position or choose a different booster seat model.
4. Position the lap belt low and snug across the child's hips according to the booster seat manufacturer's instructions.
5. Remove excess slack from the shoulder belt and ensure it crosses the center of the child's shoulder. Verify that the belt is routed correctly through any guides provided by the booster seat.
6. Follow all warnings, cautions, and fastening procedures outlined in the "Three-point type seat belt with retractor" section before driving the Nissan Frontier.
Taking a few extra moments to verify booster seat positioning, belt routing, and child comfort can significantly improve safety and help ensure that every journey in your Nissan Frontier is as secure as possible.
Nissan Frontier 2022-2026 Owner's Manual
Child restraints
- Precautions on child restraints
- LATCH (Lower Anchors and Tethers for CHildren) system
- Rear-facing child restraint installation using LATCH (Crew Cab models)
- Rear-facing child restraint installation using LATCH - jump seat (King Cab models)
- Rear-facing child restraint installation using the seat belts (Crew Cab models)
- Rear-facing child restraint installation using the seat belts - jump seat (King Cab models)
- Forward-facing child restraint installation using LATCH (Crew Cab models)
- Forward-facing child restraint installation using LATCH - jump seat (King Cab models)
- Forward-facing child restraint installation using the seat belts - front passenger and rear bench seat (Crew Cab models)
- Forward-facing child restraint installation using the seat belts - front passenger and jump seats (King Cab models)
- Booster Seats for Nissan Frontier