Nissan Frontier: In case of emergency - Flat tire
Tire Pressure Monitoring System (TPMS)
This Nissan Frontier is equipped with a Tire Pressure Monitoring System (TPMS), which continuously monitors the air pressure in all road tires. The spare tire is not monitored by the system.
When the low tire pressure warning light illuminates and the "Tire Pressure Low - Add Air" warning appears in the vehicle information display, one or more tires are significantly under-inflated. If the Nissan Frontier is driven with low tire pressure, the TPMS will alert the driver by turning on the low tire pressure warning light. The system operates only when the vehicle is driven at speeds above approximately 16 mph (25 km/h).
WARNING
- Radio waves may adversely affect electric medical equipment. Anyone using a pacemaker should contact the manufacturer of the medical device to confirm possible effects before using or operating near this system.
- If the low tire pressure warning light illuminates while driving, avoid sudden steering inputs,
abrupt braking, and aggressive maneuvers. Reduce speed, move the Nissan Frontier off the road to a
safe location, and stop as soon as it is safe to do so.
Driving with under-inflated tires can permanently damage the tires and greatly increase the risk of tire failure.
Serious vehicle damage may occur, and this could lead to an accident resulting in serious personal injury.
Check the air pressure in all four road tires. Adjust each tire to the recommended COLD tire pressure shown on the Tire and Loading Information label to turn the low tire pressure warning light off. If the warning light remains illuminated while driving after the tire pressure has been adjusted, one tire may be flat or the TPMS may not be operating correctly.
If you have a flat tire, replace it with the spare tire as soon as possible. If none of the tires are flat and all tires are properly inflated, have the Nissan Frontier inspected. It is recommended that you visit a NISSAN dealer for this service.
- When a wheel without a TPMS sensor is installed, such as the spare tire, the TPMS will not function normally and the low tire pressure warning light will flash for approximately 1 minute. After that, the light will remain on. Have the tire replaced and/or the TPMS reset as soon as possible. It is recommended that you visit a NISSAN dealer for these services.
- Installing tires that are not originally specified by NISSAN may affect the proper operation, accuracy, and reliability of the TPMS.
- Do not inject tire liquid, aerosol tire sealant, or similar repair products into the tires. These materials may damage the tire pressure sensors or cause the TPMS to malfunction.
Changing a flat tire
Basic information If your Nissan Frontier has a flat tire, follow the instructions below carefully and prioritize personal safety before attempting any tire change.
Stopping the vehicle
1. Safely move the vehicle off the road and away from traffic.
2. Turn on the hazard warning flashers to alert other drivers.
3. Park the Nissan Frontier on a level, stable surface and firmly apply the parking brake. Move the shift lever to P (Park).
4. Turn off the engine.
5. Raise the hood to warn other traffic and to signal professional roadside assistance personnel that help may be needed.
6. Have all passengers exit the vehicle and stand in a safe place, away from traffic and clear of the Nissan Frontier.
WARNING
- Make sure the parking brake is securely applied and the shift lever is placed in P (Park).
- Never change a tire when the vehicle is on a slope, ice, soft ground, or any slippery surface.
This is extremely hazardous because the vehicle may shift or fall from the jack.
- Never attempt to change a tire if oncoming traffic is close to the Nissan Frontier. Wait for professional roadside assistance instead.
Blocking wheels
- Blocks
- Flat tire
Place suitable wheel blocks at both the front and rear of the wheel diagonally opposite the flat tire. This helps prevent the Nissan Frontier from moving while it is being lifted with the jack.
WARNING
Always block the wheel securely before raising the vehicle. If the wheel is not properly blocked, the vehicle may move unexpectedly and cause personal injury.
Getting the spare tire and tools (King Cab models)
The tool storage compartment in King Cab versions of the Nissan Frontier is positioned between the two rear jump seats, allowing the driver to access the jack and tire-changing tools when emergency service is required.
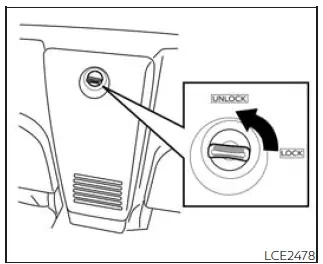
1. Turn the knob from the locked position to the unlocked position, then remove the lid from the tool storage compartment to access the stored equipment.
2. Release the retaining strap and remove the tool bag from the compartment.
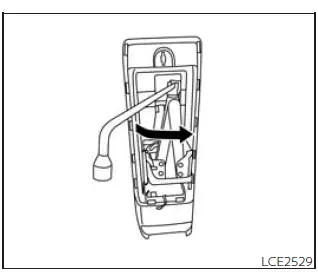
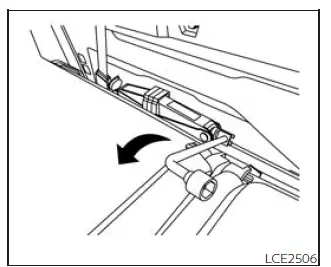
3. Collapse the jack before removing it from its storage location. Insert the wheel nut wrench into the jack screw at the top of the jack, as shown. Turn the wheel-nut wrench counterclockwise until the jack screw loosens, then continue loosening the jack by hand until it can be removed safely.
4. Remove the jack from the Nissan Frontier storage area.
5. To reinstall the jack and tools, perform steps 1 through 4 in reverse order, making sure all equipment is secured properly before driving.

Getting the spare tire and tools (Crew Cab models)
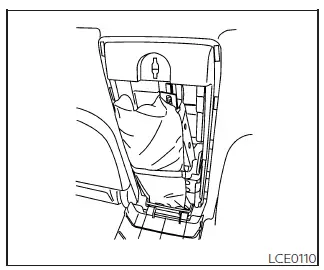
On Crew Cab models of the Nissan Frontier, the tools and tool bag are stored behind the rear bench seat.
1. Remove the head restraints/headrests, then fold the rear bench seat down to gain access to the tool storage area.
2. Remove the tool bag and locate the wheel-nut wrench needed for the spare tire and jack operation.
3. Collapse the jack so it can be removed from its storage position. Insert the wheel-nut wrench into the jack screw as shown, then turn the wheel-nut wrench toward you until the jack becomes loose.
After loosening it with the wrench, continue turning the jack screw with your fingers until the jack is completely free.
4. Remove the jack from behind the rear seat.
5. To reinstall the jack and tools in the Nissan Frontier, reverse steps 1 through 4 and confirm that every item is secured before driving.
Getting the spare tire and tools (All models)
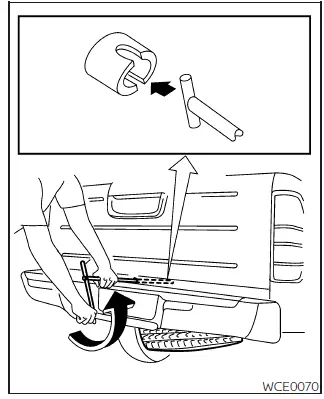
1. Insert the T-shaped end of the jacking rod into the T-shaped opening of the spare tire winch. Apply steady pressure to keep the jacking rod fully engaged with the winch, then turn the jacking rod counterclockwise to lower the spare tire from beneath the Nissan Frontier.
2. After the spare tire has been completely lowered, reach under the rear of the vehicle, remove the retainer chain, and carefully slide the tire out from beneath the Nissan Frontier.
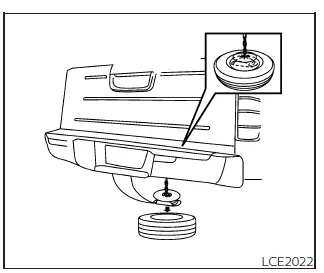
3. To reinstall the wheel, remove the center cap and pass the tire chain through the wheel. Make sure the rubber spacer is centered on the wheel before lifting. Use the assembled jacking rod to slowly rotate the winch clockwise and raise the wheel back into position under the vehicle.
NOTE:
Inspect the spacer every six years and replace it when necessary. It is recommended that you visit a NISSAN dealer for this service to ensure the spare tire retaining system remains secure.
CAUTION
- Make sure the spare tire suspending plate is centered on the wheel before lifting the spare tire into position.
- Failure to use the spacer correctly may allow the chain to become stuck in the wheel nut holes, making removal or installation more difficult.
Removing bolt-on wheel caps (if so equipped)
CAUTION
Do not pry off wheel caps or wheel covers with your hands. Doing so may cause personal injury.
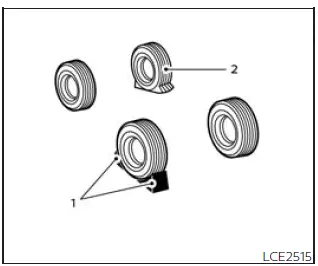
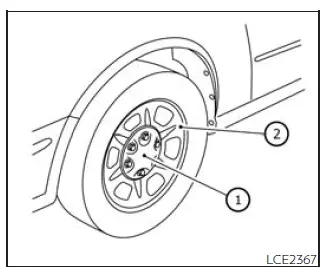
The wheel cap 1 is attached only by the wheel nuts and is separate from the wheel 2.
To remove the wheel cap, first make sure the jack is securely supporting the Nissan Frontier and the tire has cleared the ground. Then remove the wheel nuts and take off the wheel cap.
Use care to avoid scratching the wheel cap or damaging the wheel surface during removal.
Jacking up vehicle and removing the damaged tire
WARNING
- Never get under the Nissan Frontier while it is supported only by the jack. If work under the vehicle is required, support the vehicle with approved safety stands.
- Use only the jack supplied with your vehicle to lift the Nissan Frontier. Do not use this jack on any other vehicle. The jack is designed only for lifting this vehicle during a tire change.
- Use only the correct jack-up points specified for the Nissan Frontier. Never place the jack under any other part of the vehicle.
- Never raise the vehicle higher than necessary to remove and install the tire.
- Never place blocks on top of or underneath the jack.
- Do not start or run the engine while the Nissan Frontier is supported by the jack. The vehicle may move unexpectedly. This risk is especially serious on vehicles equipped with limited slip differentials.
- Do not allow passengers to remain inside the vehicle while it is raised on the jack.
- Never run the engine with one or more wheels off the ground. The vehicle may move suddenly and cause serious injury or damage.
Before lifting the Nissan Frontier, confirm that the surface is firm and level, the parking brake is fully applied, the opposite wheel is blocked, and all passengers are standing safely away from the vehicle and traffic.
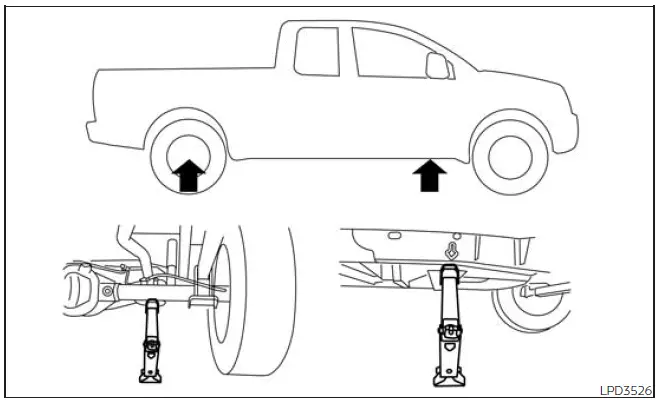
Always use the illustration as a guide to identify the correct jack placement and approved jack-up points for your specific Nissan Frontier model and jack type.
Carefully read the caution label attached to the jack body, and follow the instructions below before lifting the vehicle.
1. Loosen each wheel nut by 1 or 2 turns by turning it counterclockwise with the wheel nut wrench. Do not remove the wheel nuts completely until the tire is raised off the ground.
2. Position the jack directly beneath the correct jack-up point, as shown in the illustration, so that the top of the jack contacts the Nissan Frontier only at the approved lifting location.
Align the jack head under the arrow stamped on the side of the frame or rear section, as shown.
Use the jack only on firm, stable, and level ground. Avoid soft soil, slopes, gravel, ice, or any surface that could allow the jack to shift while the Nissan Frontier is being raised.
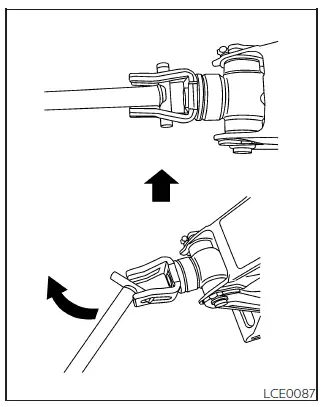
3. Install the assembled jacking rod into the jack exactly as shown.
4. To raise the vehicle, hold the jacking lever and rod securely. Lift the Nissan Frontier slowly and carefully until the damaged tire clears the ground.
5. Remove the wheel nuts completely, then remove the damaged tire from the vehicle.
Installing the spare tire
The spare tire is intended for emergency use only.
1. Clean away any mud, dirt, rust, or debris from the mounting surface between the wheel and hub. A clean contact surface helps the spare tire sit correctly against the hub.
2. Carefully install the spare tire on the Nissan Frontier and tighten the wheel nuts by hand until they are finger tight.
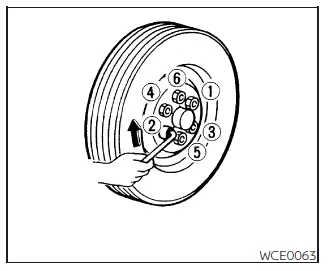
3. Using the wheel nut wrench, tighten the wheel nuts alternately and evenly in the sequence shown in the illustration ( 1 , 2 , 3 , 4 , 5 , 6 ) until they are snug.
4. Slowly lower the vehicle until the tire touches the ground. Then use the wheel nut wrench to tighten the wheel nuts securely in the illustrated sequence ( 1 , 2 , 3 , 4 , 5 , 6 ). After the wheel nuts are tightened, lower the Nissan Frontier completely.
WARNING
- Incorrect wheel nuts or wheel nuts that are not tightened properly can allow the wheel to loosen or
separate from the vehicle.
This could cause loss of control and may result in an accident.
- Do not apply oil, grease, or any lubricant to the wheel studs or wheel nuts. Lubrication can cause the nuts to loosen during driving.
- Retighten the wheel nuts after the Nissan Frontier has been driven for 620 miles (1,000 km), including after a flat tire replacement or similar wheel removal service.
As soon as possible, tighten the wheel nuts to the specified torque using a proper torque wrench.
Wheel nut tightening torque: 98 ft-lb (133 N·m)
The wheel nuts must always remain tightened to specification. It is recommended that the wheel nuts on the Nissan Frontier be checked and tightened to specification at every lubrication interval.
Adjust the tire pressure to the recommended COLD pressure.
COLD pressure means the vehicle has been parked for 3 hours or more, or has been driven less than 1 mile (1.6 km).
The correct COLD tire pressures are listed on the Tire and Loading Information label located in the driver’s door opening.
5. Securely store the jacking equipment inside the Nissan Frontier and properly secure the flat tire under the vehicle.
WARNING
- Always make sure the spare tire and all jacking equipment are properly secured after use. Loose tools, the jack, or an unsecured wheel can become dangerous projectiles during a sudden stop or collision.
- The spare tire is designed for temporary emergency use and should be replaced with a proper road tire as soon as possible.
After installing the spare tire, drive cautiously, avoid high speeds, and have the damaged tire inspected or repaired promptly. Proper tire pressure, correct wheel nut torque, and secure storage of tools are essential for safe Nissan Frontier operation after a flat tire emergency.