Ford Focus Service Manual: Transaxle - Installation (Automatic Transaxle/Transmission — 4F27E)

|
Adapter for 303-290A 303-290-01 |

|
Adapter for 303-290A (Support Leg) 303-290-03A |

|
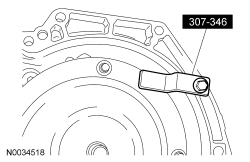
Retainer, Torque Converter 307-346 (T97T-7902-A) |

|
Support Bar, Engine 303-290A |
| Item | Specification |
|---|---|
| Motorcraft® MERCON® LV Automatic Transmission Fluid XT-10-QLVC (US); CXT-10-LV12 (Canada) | MERCON® LV |
| Multi-Purpose Grease Motorcraft® XL-5 (aerosol) and/or CRC® SL3151 | ESB-M1C93-B |
Installation
- NOTE:
Lubricate the torque converter pilot hub with multi-purpose grease.
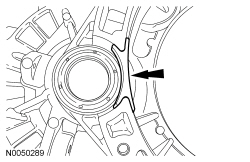
Check the installation depth of the torque converter.- Lay a steel straightedge on the automatic transaxle flange.
- Check the installation depth between the transaxle flange and the torque converter centering spigot for the correct clearance.

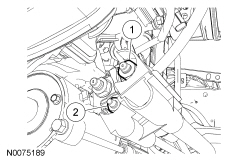
- Install the selector lever cable bracket and the 2 bolts.
- Tighten to 25 Nm (18 lb-ft).
- Install the transaxle support insulator bracket and 3 nuts.
- Tighten to 80 Nm (59 lb-ft).
- If the transaxle was replaced, install the transaxle opening cover.
- Remove the Torque Converter Retainer.
- NOTICE: Make sure that the dowel pins are installed in the engine block
prior to installing the transaxle or damage to the transaxle can occur.
Position the transaxle on the dowel pins.
- Note the location of the different length bolts and install the 5 transaxle-to-engine
bolts.
- Tighten to 47 Nm (35 lb-ft).
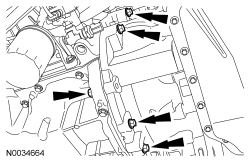
- Install the 3 transaxle-to-engine bolts.
- Tighten to 47 Nm (35 lb-ft).
- Remove the transmission jack and the safety strap from the transaxle.
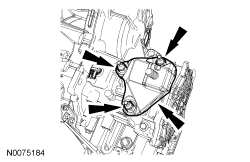
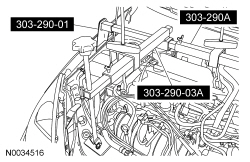
- Using the Engine Support Bar and Adapters, raise the engine and transaxle assembly slightly to install the rear transaxle support insulator.
- Install the transaxle support insulator nuts.
- Install the 4 transaxle support insulator-to-body nuts.
- Tighten to 48 Nm (35 lb-ft).
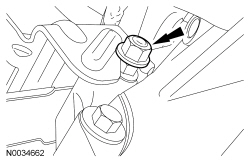
- Install the transaxle support insulator-to-bracket nut.
- Tighten to 150 Nm (111 lb-ft).
- Install the 4 transaxle support insulator-to-body nuts.
- Remove the Engine Support Bar and Adapters.
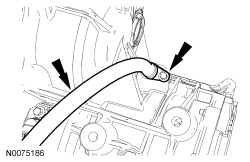
- Install the transmission fluid cooler tubes on the transaxle until they
bottom out and slide the latches to the locked position.
- Pull back on each connector to confirm that it is locked on the transaxle.
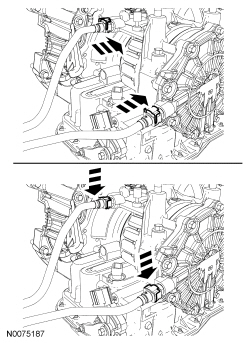
- Install the transmission fluid cooler tube secondary latches.

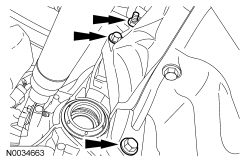
- Install the upper transaxle-to-engine bolts.
- Tighten to 47 Nm (35 lb-ft).
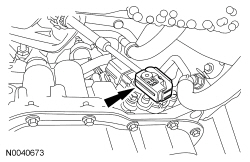
- Position the electrical connector bracket and install the nut.
- Tighten to 25 Nm (18 lb-ft).
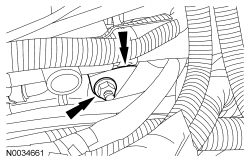
- Install the electrical connector bracket nut.
- Tighten to 25 Nm (18 lb-ft).
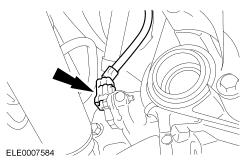
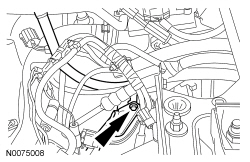
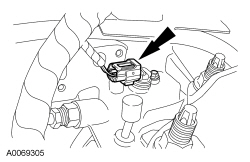
- Connect the Output Shaft Speed (OSS) sensor electrical connector.
- NOTICE: The roll restrictor bolts are different lengths. If the long
bolt is used to hold the roll restrictor to the subframe, damage to the steering
rack may occur.
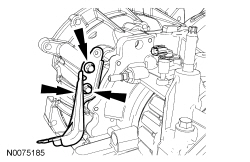
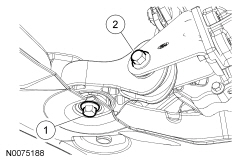
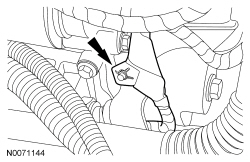
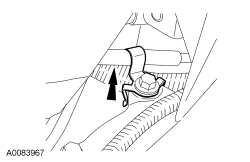
Install the engine roll restrictor.
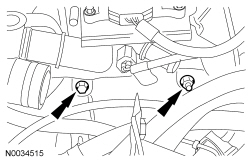
- Position the roll restrictor in place and loosely install the bolt.
- Install the bolt. Tighten both roll restrictor bolts.
- Tighten to 70 Nm (52 lb-ft).
- NOTICE: Only rotate the engine in a clockwise direction or engine damage
will occur.
NOTE:
Only install new self-locking nuts.
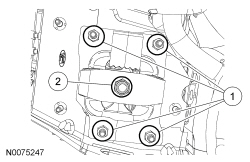
Install 4 new torque converter-to-flexplate nuts.- Tighten to 40 Nm (30 lb-ft).
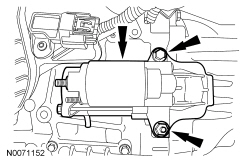
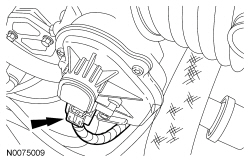
- Install the starter isolator.
- Install the starter, studbolt and bolt.
- Tighten to 35 Nm (26 lb-ft).
- Using a new gasket, install the oil filter adapter and the 4 bolts.
- Tighten to 25 Nm (18 lb-ft).
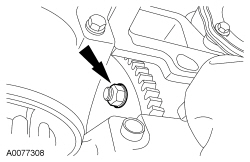
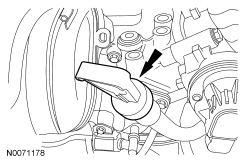
- Install a new oil filter.
- Tighten the oil filter three-fourths turn after the oil filter gasket makes contact with the oil filter adapter.
- Connect the EOP switch electrical connector.
- Connect the bracket to the starter stud and the starter bracket nut.
- Tighten to 20 Nm (177 lb-in).
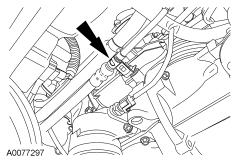
- Install the wiring harness retainer on the starter motor studbolt.
- Connect the starter motor electrical connectors.
- Install the starter terminal nut.
- Tighten to 12 Nm (106 lb-in).
- Install the starter solenoid terminal nut.
- Tighten to 5 Nm (44 lb-in).
- Install the starter terminal nut.
- Install the LH and RH halfshafts in the transaxle. For additional information, refer to Section 205-04.
- Install the front wheels and tires. For additional information, refer to Section 204-04.
- NOTE:
Inspect the transmission fluid filler tube O-ring for damage before installing the transmission fluid filler tube.
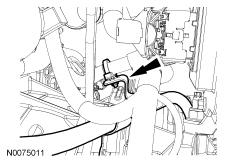
Install the transaxle filler tube and bolt.
- Tighten to 8 Nm (71 lb-in).
- Install the power steering hose retainers and the wiring harness retainer on the transaxle filler tube.
- Install the transmission fluid level indicator.
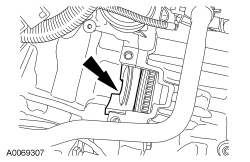
- Connect the bottom PCM electrical connector.
- Connect the throttle control electrical connector.
- Install the selector lever cable in the selector lever cable clip.
- Install the selector lever cable in the selector lever cable bracket.

- Connect the selector lever cable end onto the manual control lever.
- Install the transaxle filler tube bolt.
- Tighten to 8 Nm (71 lb-in).
- Connect the Turbine Shaft Speed (TSS) sensor electrical connector.
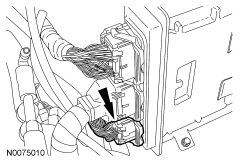
- NOTE:
The Transmission Range (TR) connector seal is a high compression type and requires a "press to click" installation for a weatherproof seal.
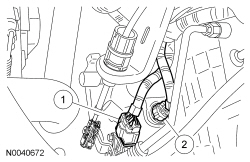
Connect the electrical connectors.
- TR sensor
- Transaxle solenoid electrical connector
- Install the Air Cleaner (ACL) . For additional information, refer to Section 303-12.
- NOTE:
When the battery has been disconnected and reconnected, some abnormal drive symptoms may occur while the vehicle relearns its adaptive strategy. The vehicle may need to be driven to relearn the strategy.
Install the battery tray. For additional information, refer to Section 414-01.
- Fill the transaxle with clean transmission fluid.
- Top off the engine with clean engine oil.
 Transaxle - Disassembly (Manual Transaxle/Transmission — MTX75)
Special Tool(s)
Heat Gun
107-R0300 or equivalent
Holding Fixture, Transmission
307-003 (T57L-500-B)
Remover, Pilot Bearing
3 ...
 Transaxle - Installation (Manual Transaxle/Transmission — MTX75)
Material
Item
Specification
Motorcraft® Full Synthetic Manual Transmission Fluid
XT-M5-QS
WSD-M2C200-C
High Performance DOT 3 Motor Vehicle Brake Fluid
PM ...
More about Ford Focus:
Ford Focus Window Moulding - Door
Item
Part Number
Description
1
6320898 RH/ 6320899 LH
Window moulding — front door
2
20124-5
Front door
Item
Part Number
Description
1
6320898 RH/ 6320899 LH
Window moulding — front do ...
