Ford Focus Service Manual: Catalytic Converter
Removal
All vehicles
- With the vehicle in NEUTRAL, position it on a hoist. For additional information, refer to Section 100-02.
- NOTICE: Do not excessively bend or twist the exhaust flexible pipe. Failure
to follow these instructions may cause damage to the flexible pipe.
Support the exhaust flexible pipe with a support wrap or suitable splint.
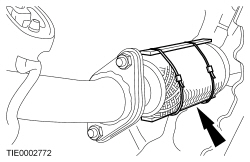
Partial Zero Emissions Vehicle (PZEV)
- Remove the 2 catalytic converter-to-exhaust flexible pipe nuts.
- Discard the nuts and gasket.
Non-Partial Zero Emissions Vehicle (PZEV)
- Remove the 2 catalytic converter-to-muffler and tailpipe assembly nuts.
- Discard the nuts and gasket.
All vehicles
- Remove the 4 bolts and the catalytic converter-to-engine bracket.
- Remove the 3 bolts from the lower heat shield.
- NOTE:
It may be necessary to reposition the engine during catalytic converter removal.
Remove the roll restrictor bolt.
- Disconnect the Catalyst Monitor Sensor (CMS) and Heated Oxygen Sensor (HO2S) electrical connectors.
- Remove the 6 bolts and the upper heat shield.
- Remove the 2 retainers and the Evaporative Emission (EVAP) canister purge valve heat shield.
- Disconnect the EVAP canister purge valve electrical connector.
- Release the tab and remove the canister purge valve from the bracket, then position aside.
- Detach the fuel tube from the canister purge valve bracket.
- Remove the 2 EVAP canister purge valve bracket bolts and position the EVAP canister purge valve bracket aside.
- Remove and discard the 7 catalytic converter nuts.
- Remove the bolt and the engine lifting eye.
- NOTE:
An assistant will be needed to remove the catalytic converter and lower heat shield from the vehicle. Do not let the catalytic converter or the lower heat shield come in contact with the valve cover.
Reposition the engine and carefully pull the catalytic converter and heat shield upward. Roll the heat shield toward the RH side of the vehicle and off of the catalytic converter.
- Remove the catalytic converter from the vehicle.
- Discard the gasket.
- Remove and discard the 7 catalytic converter-to-cylinder head studs.
- Clean and inspect the catalytic converter flange. For additional information, refer to Exhaust Manifold Cleaning and Inspection in Section 303-00.
Installation
All vehicles
- Install the 7 new catalytic converter-to-cylinder head studs.
- Tighten to 17 Nm (150 lb-in).
- Position the new gasket on the engine.
- NOTE:
An assistant will be needed to install the catalytic converter and lower heat shield in the vehicle. Do not let the catalytic converter or the lower heat shield come in contact with the valve cover.
Reposition the engine and carefully lower the catalytic converter and heat shield downward. Roll the heat shield toward the LH side of the vehicle and onto the catalytic converter.
- Using 7 new nuts, install the catalytic converter onto the engine.
- NOTICE: Failure to tighten the catalytic converter manifold nuts to specification
a second time may cause the converter to develop an exhaust leak. Due to the
possibility of the catalytic converter nuts loosening after the first tightening
sequence, a second sequence (stage 2) will ensure that the catalytic converter
nuts are properly torqued.
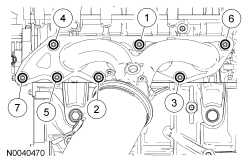
Tighten the 7 new catalytic converter nuts in 2 stages in the sequence shown.
- Stage 1: Tighten to 55 Nm (41 lb-ft).
- Stage 2: Tighten to 55 Nm (41 lb-ft).
- Install the engine lifting eyelet and the bolt.
- Tighten to 45 Nm (33 lb-ft).
- Reposition the EVAP canister purge valve bracket and install the 2 bolts.
- Tighten to 6 Nm (53 lb-in).
- Attach the fuel tube to the canister purge valve bracket.
- Install the canister purge valve on the canister purge valve bracket.
- Connect the EVAP canister purge valve electrical connector.
- Install the EVAP canister purge valve heat shield and the 2 retainers.
- Connect the HO2S and CMS electrical connectors.
- Install the roll restrictor bolt.
- Tighten to 70 Nm (52 lb-ft).
- Position the lower heat shield and install the 3 bolts.
- Tighten to 11 Nm (97 lb-in).
- Install the catalytic converter-to-engine bracket and the 2 bolts.
- Tighten to 47 Nm (35 lb-ft).
- Install the 2 catalytic converter bracket-to-engine bracket bolts.
- Tighten to 23 Nm (17 lb-ft).
Non-PZEV
- Using a new gasket, attach the catalytic converter-to-muffler and tailpipe
assembly and install the 2 new nuts.
- Tighten to 47 Nm (35 lb-ft).
PZEV
- Using a new gasket, attach the exhaust flexible pipe-to-muffler and tailpipe
assembly and install the 2 new nuts.
- Tighten to 47 Nm (35 lb-ft).
All vehicles
- Remove the exhaust flexible pipe support wrap or suitable splint.
- Install the upper heat shield and the 6 bolts.
- Tighten to 11 Nm (97 lb-in).
 Engine Emission Control
NOTE: Do not permanently remove or render inoperative any part of the
vehicle emission control system including related hardware. Failure to comply may
violate applicable state and federal laws.
...
 Exhaust Gas Recirculation (EGR) Valve
Material
Item
Specification
Motorcraft Metal Surface Prep
ZC-31-A
—
Removal and Installation
Item
Part Number
Description
1 ...
More about Ford Focus:
Ford Focus Handles, Locks, Latches and Entry Systems
NOTE: The Smart Junction Box (SJB) is also known as the Generic Electronic
Module (GEM) .
Hood Latch
The hood latch consists of the following components:
Hood latch release handle and cable
Hood latch
Front Door
The front door consists of the following components:
Door ajar ...
Nissan Frontier - Instrument Panel - Keys - Brake system
