Ford Focus Service Manual: Restoring Corrosion Protection Following Repair

|
Rust Inhibitor Installation Kit 286-00002 |

|
Undercoating Spray Gun 286-00001 |
| Item | Specification |
|---|---|
| Motorcraft® Metal Surface Prep ZC-31-A | — |
| Premium Undercoating ValuGard™ VG101, VG101A (aerosol) | — |
| Rust Inhibitor ValuGard™ VG104, VG104A (aerosol) |
— |
 WARNING: Always
refer to Material Safety Data Sheet (MSDS) when handling chemicals and wear protective
equipment as directed. Examples may include but are not limited to respirators and
chemically resistant gloves. Failure to follow these instructions may result in
serious personal injury.
WARNING: Always
wear protective equipment including eye protection with side shields, and a dust
mask when sanding or grinding. Failure to follow these instructions may result in
serious personal injury.
NOTICE: Drilling access holes in body panels is not recommended. Drilling holes will break the original paint finish and promote corrosion.
NOTE:
Corrosion protection needs to be restored whenever it is necessary to sand or grind through painted surfaces or E-coat, or when bare metal repairs are made.
NOTE:
Refer to product label for preparation and handling instructions.
- The surfaces must be free of oil, dirt and other foreign material. Carry
out the process in the following sequence.
- Thoroughly clean and degrease metal surfaces using metal surface prep to remove wax and grease.
- For best results, the vehicle should be at room temperature. Attach the rust inhibitor canister to the Rust Inhibitor Installation Kit 286-00002.
- Rust inhibitor should be applied after the welding and refinishing process. Product cannot be welded through.
- Air pressure setting for applicator gun is 448-517 kPa (65-75 psi).
- Use the long wand when spraying enclosed areas. The spray nozzle provides a 360-degree spray pattern. Insert the wand as far as possible into the access hole, pull the trigger and wait 2-3 seconds and slowly pull the wand out of the access hole.
- The short, hook-shaped wand sprays in one direction and must be rotated to provide complete coverage.
- Apply the material in light mist coats.
- Material displaces moisture.
- Clean up any overspray with a mild solvent such as mineral spirits or bug and tar remover.
NOTE:
The following illustrations provide typical applications of body seams and spot welded flanges and are not vehicle specific.
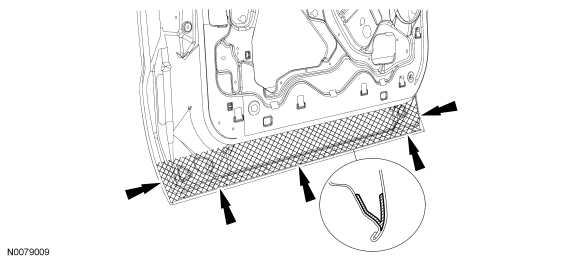
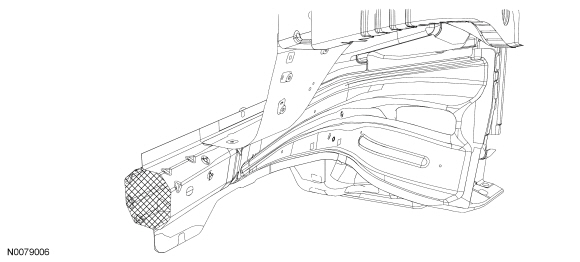
- NOTE:
Door assembly lower view.
Apply rust inhibitor as shown to the inside of the door shell on all the interior metal surfaces using the most suitable applicator wand. Apply material to the exposed edges after carrying out the welding process. Make sure horizontal surfaces are well protected as they are more susceptible to corrosion. Keep door drain holes clear to prevent moisture buildup.
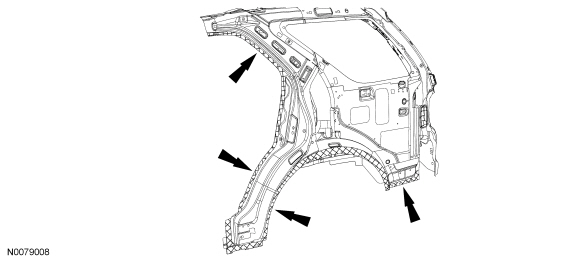
- NOTE:
Quarter panel inner view.
Apply rust inhibitor to the closed channel portion of the spot weld flange areas using the short, hook-shaped wand. Apply material to the exposed edges after carrying out the welding process. Make sure horizontal surfaces are well protected as they are more susceptible to corrosion.
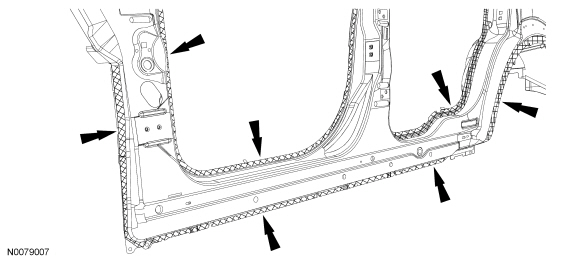
- NOTE:
Door frame opening view.
Apply rust inhibitor to the closed channel portion of the spot weld flange areas using the short, hook-shaped wand. Make sure horizontal surfaces are well protected as they are more susceptible to corrosion.
Body and Frame Undercoating
- WARNING: Always
refer to Material Safety Data Sheet (MSDS) when handling chemicals and wear protective equipment as directed. Examples may include but are not limited to respirators and chemically resistant gloves. Failure to follow these instructions may result in serious personal injury.WARNING: Always
wear protective equipment including eye protection with side shields, and a dust mask when sanding or grinding. Failure to follow these instructions may result in serious personal injury.NOTICE: Do not allow undercoating on powertrain components. Failure to follow these instructions may result in incorrect operation of these components.
NOTE:
Refer to product label for preparation and handling instructions.
NOTE:
Avoid high-pressure water spray cleaning to treated underbody area for 24 hours.
Wire brush the area and make sure the surfaces are free of oil, dirt and other foreign material. Carry out the undercoating process in the following sequence.- Thoroughly clean and degrease metal surfaces using metal surface prep to remove wax and grease.
- For best results, the vehicle should be at room temperature.
- Canister attaches directly to the dispensing gun. Attach the undercoating canister to the Undercoating Spray Gun 286-00001.
- Undercoat should be applied after the welding and refinishing process. Product cannot be welded through.
- Air pressure setting for applicator gun is 552-621 kPa (80-90 psi).
- Apply light mist coats, applicator sprays in fogging pattern.
- Material displaces moisture.
- Clean up any overspray with a mild solvent such as mineral spirits or bug and tar remover.
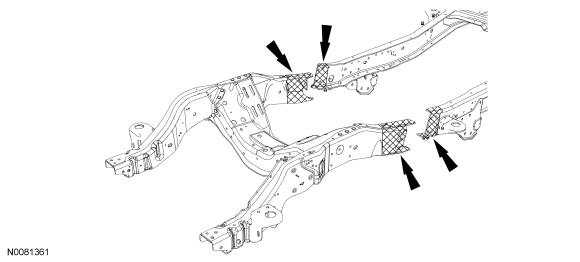
NOTE:
The following illustrations provide typical applications to frame rails and are not vehicle specific.
- NOTE:
Frame rail exterior spot-weld flange view.
Apply undercoat material to the exterior exposed edges after carrying out the welding and refinishing process.
- NOTE:
Cross section view of typical unibody frame rail shown.
Apply rust inhibitor to the inner surfaces of the rail after carrying out welding process. Use the long wand and insert as far as possible, depress trigger and wait 2-3 seconds and slowly pull the wand to make sure the area is completely fogged.
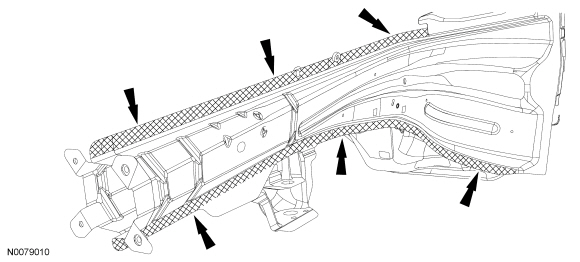
- NOTE:
Full frame vehicle, front rail-to-mid rail section repair shown.
Apply undercoat material to the exposed surfaces after carrying out the welding process. Make sure to completely cover any bare metal areas.

 Frame Members
General Equipment
3 Phase Inverter Spot Welder 254-00002
Compuspot 700F Welder 190-50080
I4 Inverter Spot Welder 254-00014
Inverter Welder with MIG Welder 254- ...
More about Ford Focus:
Ford Focus Headlamp Bulb - Removal and Installation
NOTE: The headlamp assembly is shown removed for clarity.
Item
Part Number
Description
1
13008
Headlamp assembly
2
13N021
Headlamp bulb
Removal and Installation
WARNING: The bulb
contains gas under pressure. The bulb may shatte ...
Nissan Frontier - Instrument Panel - Keys - Brake system
