Ford Focus Service Manual: Selector Lever Cable
Selector Lever Cable — Partial Zero Emissions Vehicle (PZEV)
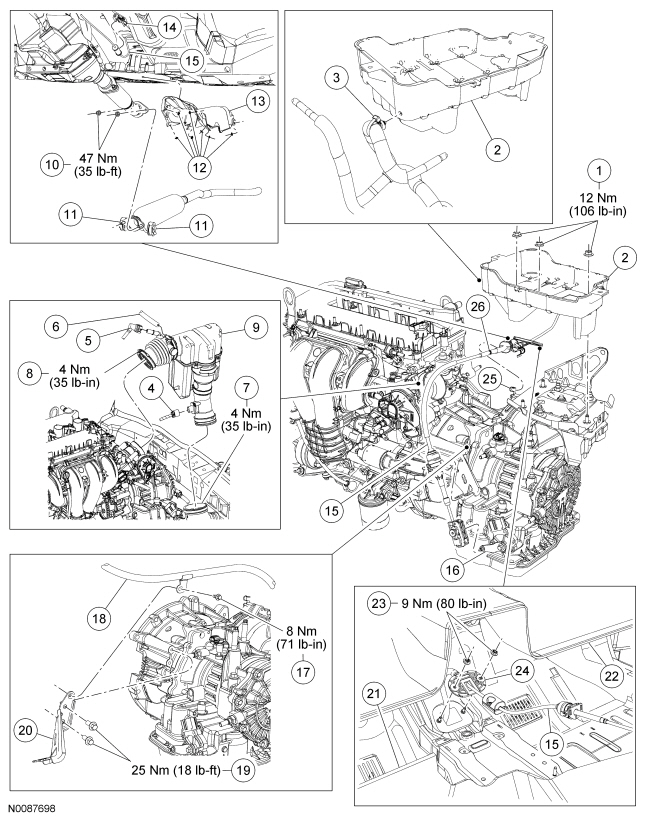
| Item | Part Number | Description |
|---|---|---|
| 1 | W700069 | Battery tray nuts (3 required) |
| 2 | 10723 | Battery tray |
| 3 | 14A169 | Engine wiring harness retainer |
| 4 | 14A464 | Mass Air Flow (MAF) sensor electrical connector |
| 5 | 6758 | Tube assembly — crankcase vent |
| 6 | — | Vacuum hose — brake booster |
| 7 | 9C632 | Air Cleaner (ACL) inlet tube clamp |
| 8 | 9C632 | ACL outlet tube clamp |
| 9 | 9C662 | ACL assembly |
| 10 | W705443 | Exhaust nuts |
| 11 | 5A262 | Exhaust hangers |
| 12 | W709729 | Exhaust heat shield retainers |
| 13 | A11468 | Exhaust heat shield |
| 14 | 4560 | Selector lever cable retainer |
| 15 | 7E395 | Selector lever cable |
| 16 | 7210 | Manual control lever |
| 17 | W505252 | Transmission fluid filler tube bolt |
| 18 | 7A228 | Transmission fluid filler tube |
| 19 | W500023 | Selector lever cable bracket bolts |
| 20 | 7B229 | Selector lever cable bracket |
| 21 | 5411454 | Carpet |
| 22 | 5401688 | Insulation |
| 23 | W702751 | Selector lever cable grommet nuts |
| 24 | — | Selector lever cable grommet (part of 7E395) |
| 25 | 7E364 | Selector lever cable retaining bracket |
| 26 | — | Selector lever cable alignment mark (part of 7E395) |
Selector Lever Cable — Non-Partial Zero Emissions Vehicle (PZEV)
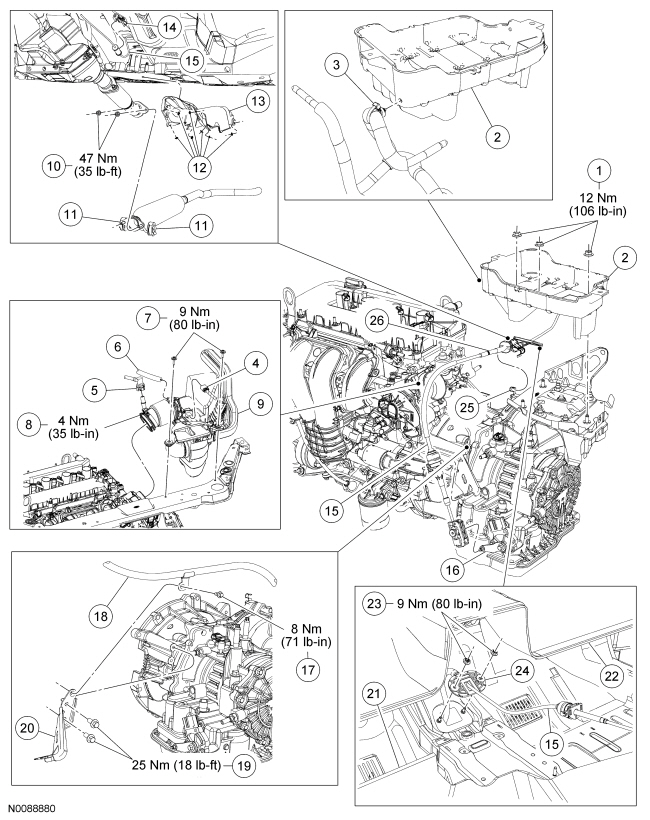
| Item | Part Number | Description |
|---|---|---|
| 1 | W700069 | Battery tray nuts (3 required) |
| 2 | 10723 | Battery tray |
| 3 | 14A169 | Engine wiring harness retainer |
| 4 | 14A464 | Mass Air Flow (MAF) sensor electrical connector |
| 5 | 6758 | Tube assembly — crankcase vent |
| 6 | — | Vacuum hose — brake booster |
| 7 | W701389 | Air Cleaner (ACL) assembly bolts |
| 8 | 9C632 | ACL outlet tube clamp |
| 9 | 9C662 | ACL assembly |
| 10 | W705443 | Exhaust nuts |
| 11 | 5A262 | Exhaust hangers |
| 12 | W709729 | Exhaust heat shield retainers |
| 13 | A11468 | Exhaust heat shield |
| 14 | 4560 | Selector lever cable retainer |
| 15 | 7E395 | Selector lever cable |
| 16 | 7210 | Manual control lever |
| 17 | W505252 | Transmission fluid filler tube bolt |
| 18 | 7A228 | Transmission fluid filler tube |
| 19 | W500023 | Selector lever cable bracket bolts |
| 20 | 7B229 | Selector lever cable bracket |
| 21 | 5411454 | Carpet |
| 22 | 5401688 | Insulation |
| 23 | W702751 | Selector lever cable grommet nuts |
| 24 | — | Selector lever cable grommet (part of 7E395) |
| 25 | 7E364 | Selector lever cable retaining bracket |
| 26 | — | Selector lever cable alignment mark (part of 7E395) |
Removal
All vehicles
- With the vehicle in NEUTRAL, position it on a hoist. For additional information, refer to Section 100-02.
- Remove the battery. For additional information, refer to Section 414-01.
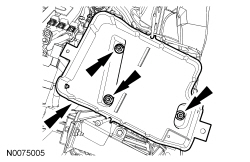
- Remove the 3 battery tray nuts. Pull the battery tray up, disconnect the wiring harness fasteners from the battery tray and remove the battery tray.
- NOTE:
Partial Zero Emissions Vehicle (PZEV) shown, non-PZEV similar.
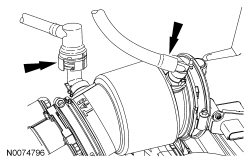
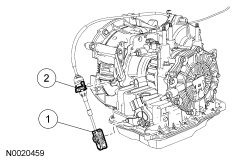
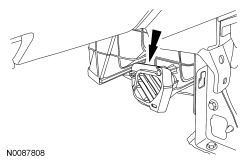
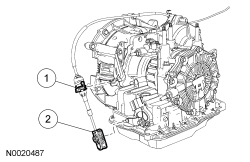
Disconnect the Mass Air Flow (MAF) sensor electrical connector.
- NOTE:
Non-PZEV shown, PZEV similar.
Disconnect the crankcase ventilation hose and disconnect the brake booster vacuum hose.
Partial Zero Emissions Vehicle (PZEV)
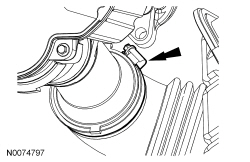
- Loosen the Air Cleaner (ACL) inlet hose clamp.
Non-PZEV
- Remove the 2 bolts.
All vehicles
- Loosen the clamp, pull the ACL assembly straight up and remove the ACL assembly.
- NOTICE: Excessive bending of the flexible exhaust pipe may cause damage
resulting in failure. Support the flexible exhaust pipe with a support wrap
or suitable splint.
Support the flexible exhaust pipe, using a suitable wrap.
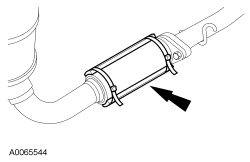
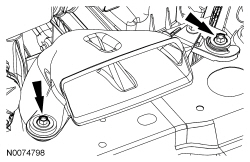
- Disconnect the front exhaust pipe and detach the support isolators.
- Discard the gasket.
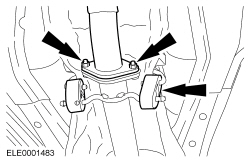
- Disconnect the center exhaust hanger and support the exhaust with wire.
- Remove the 8 fasteners and the exhaust heat shield.
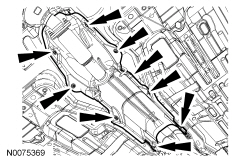
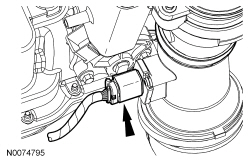
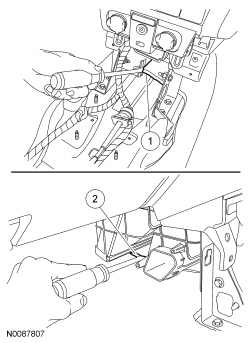
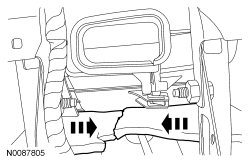
- Disconnect the selector lever cable from the retainer on the unibody and the selector lever cable retaining bracket on the transaxle.
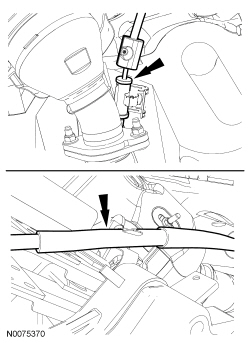
- Disconnect the selector lever cable from the selector lever cable bracket
and manual control lever.
- Disconnect the selector lever cable end from the manual control lever.
- Depress the tabs on the selector lever cable and remove the selector
lever cable from the selector lever cable bracket.
- Position the selector lever cable aside.
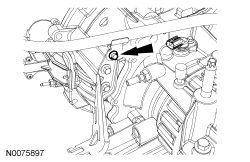
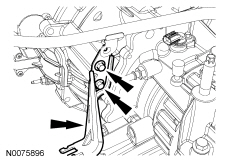
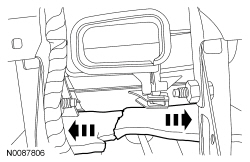
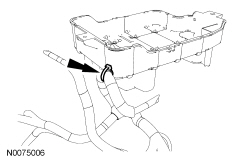
- Remove the transmission fluid filler tube bolt from the selector lever cable bracket.
- Remove the 2 selector lever cable bracket bolts and the selector lever cable bracket.
- Remove the selector lever. For additional information, refer to Selector Lever in this section.
- Remove the 2 screws and the LH floor vent.
- NOTICE: When cutting the carpet, use care not to damage the heater core
and evaporative core housing.
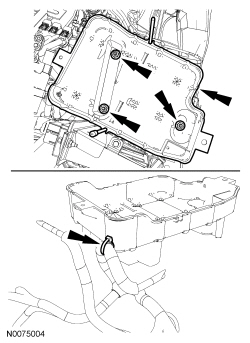
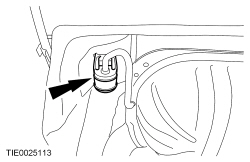
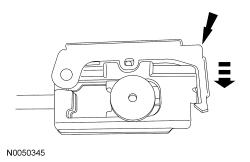
Using a suitable tool, cut the carpet in the center under the heater core and evaporator core housing to gain access to the selector lever cable grommet in the following sequence.
- Begin cutting the carpet where the selector lever cable is exposed and cut the carpet back until the tool no longer fits between the floor and the heater core and evaporator core housing.
- To cut the carpet further forward, access the carpet with the tool through the LH side of the heater core and evaporator core housing. Cut the carpet far enough forward to be able to position the carpet out from under the heater core and evaporator core housing to access the selector lever cable grommet.
- Position the carpet out from under the heater core and evaporator core housing to gain access to the selector lever cable grommet.
- NOTE:
Heater core and evaporator core housing removed for clarity.
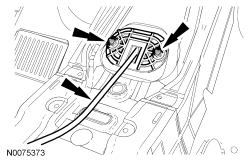
Remove the 2 selector lever cable grommet nuts.
- Remove the selector lever cable.
- Pull the selector lever cable through the floor panel and remove it through the passenger compartment.
Installation
All vehicles
- NOTE:
Heater core and evaporator core housing removed for clarity.
Position the selector lever cable in place, install the grommet on the floor panel and install the 2 nuts.
- Tighten to 9 Nm (80 lb-in).
- Position the carpet back in place under the heater core and evaporator core housing.
- Install the LH floor vent and the 2 screws.
- Install the selector lever. For additional information, refer to Selector Lever in this section.
- Position the selector lever cable bracket in place and install the 2 bolts.
- Tighten to 25 Nm (18 lb-ft).
- Install the transmission fluid filler tube bolt.
- Tighten to 8 Nm (71 lb-in).
- Move the selector lever to the DRIVE position.
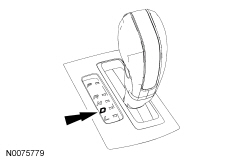
- Move the manual control lever to the DRIVE position.
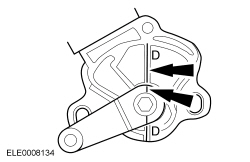
- Unlock the selector lever cable end. Make sure that the selector lever cable end moves freely.
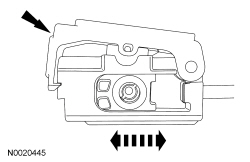
- NOTE:
When installing the selector lever cable, make sure that the selector lever cable locking tabs are locked in place and the selector lever cable end is snapped onto the ball stud. Press the selector lever cable into the selector lever cable bracket and listen for the selector lever cable to click in place. Pull back on the selector lever cable to make sure that it is locked into the selector lever cable bracket. Also make sure that the selector lever cable end is correctly installed onto the ball stud. Pull back on the selector lever cable end to make sure that the selector lever cable end is correctly installed.
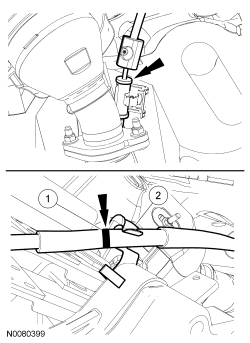
Connect the selector lever cable end to the manual control lever.
- Connect the selector lever cable to the selector lever cable bracket.
- Connect the selector lever cable end to the manual control lever.
- Press the lock tab down to secure the cable end from moving.
- NOTICE: Make sure selector lever cable alignment mark is in the correct
position. Damage can occur to the selector lever cable if not aligned correctly.
Install the selector lever cable in the retainer on the unibody and in the selector lever cable retaining bracket.
- Center the selector lever cable alignment mark with the selector lever retaining bracket.
- Press the selector lever cable into the selector lever cable retaining bracket covering the selector lever cable alignment mark.
- Install the exhaust heat shield and the 8 fasteners.
- Connect the center exhaust hanger and remove the support wire.
- NOTE:
Install a new exhaust flange gasket.
Attach the exhaust pipe support insulators and connect the front exhaust pipe.
- Tighten to 47 Nm (35 lb-ft).
- Remove the support wrap.
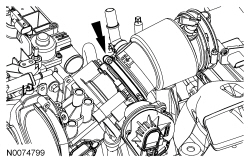
- Position the ACL in place and tighten the ACL outlet pipe clamp.
- Tighten to 4 Nm (35 lb-in).
- NOTE:
PZEV shown, non-PZEV similar.
Connect the crankcase ventilation hose and connect the brake booster vacuum hose.
PZEV
- Tighten the ACL inlet hose clamp.
- Tighten to 4 Nm (35 lb-in).
Non-PZEV
- Install the 2 ACL bolts.
- Tighten to 9 Nm (80 lb-in).
All vehicles
- NOTE:
PZEV shown, non-PZEV similar.
Connect the MAF sensor electrical connector.
- Position the battery tray in place and install the 4 wiring harness retainers on the battery tray.
- Position the battery tray on the studs and install the 3 battery tray nuts.
- Tighten to 12 Nm (106 lb-in).
- NOTE:
When the battery has been disconnected and reconnected, some abnormal drive symptoms may occur while the vehicle relearns its adaptive strategy. The vehicle may need to be driven to relearn the strategy.
Install the battery. For additional information, refer to Section 414-01.
 Selector Lever Bezel
Item
Part Number
Description
1
5404567
Center console trim cover
2
7C453
Transmission Control Switch (TCS) electrical connector
3
...
 Selector Lever Cable Adjustment
With the vehicle in NEUTRAL, position it on a hoist. For additional information,
refer to Section 100-02.
Move the selector lever to the DRIVE position.
Disconnect the ...
More about Ford Focus:
Ford Focus Reference Value Parameter Identification (PID)/Measured Signal Chart
The following listing reflects PIDS and/or measured values which may reveal a
possible concern within each system shown. Match the category number with the related
PID/measured signal and go to the Typical Diagnostic Reference Value Charts.
PID/Measured Signal Chart
Category Numbe ...
Nissan Frontier - Instrument Panel - Keys - Brake system
