Ford Focus Service Manual: Window Glass - Rear Quarter

|
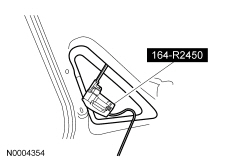
Deluxe Windshield Removal Tool 164-R2450 or equivalent |

|
Pneumatic Knife with Offset Blade 107-R1511 or equivalent |
| Item | Specification |
|---|---|
| Dow Urethane Adhesive Betaseal™ Express | — |
| Dow Urethane One Step Glass Primer Betaprime™ 5500 / 5500A / 5500SA | — |
| Sika Urethane Adhesive Sika Tack ASAP | — |
| Sika Urethane Metal and Glass Primer Sika 206 G+P | — |
| Ultra-Clear Spray Glass Cleaner ZC-23 | ESR-M14P5-A |
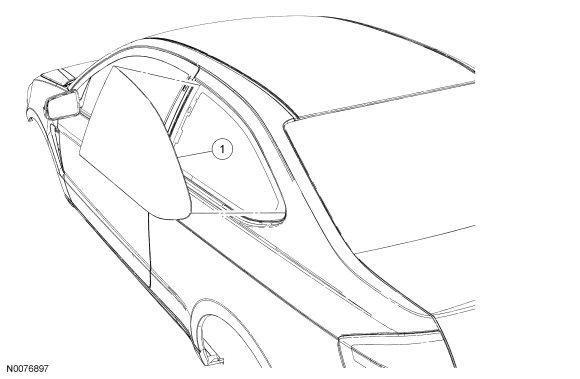
2-Door Vehicles
| Item | Part Number | Description |
|---|---|---|
| 1 | 5429710 RH/ 5429711 LH | Rear quarter window glass |
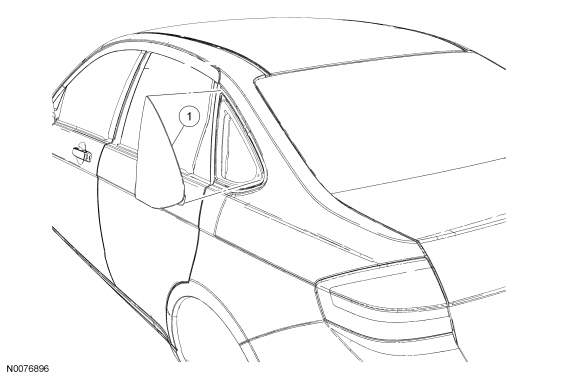
4-Door Vehicles
| Item | Part Number | Description |
|---|---|---|
| 1 | 5429710 RH/ 5429711 LH | Rear quarter window glass |
Removal
2-door vehicles
- Remove the B-pillar trim panel. For additional information, refer to Section 501-05.
4-door vehicles
- Remove the quarter trim panel. For additional information, refer to Section 501-05.
All vehicles
- Before cutting the urethane adhesive, remove dirt and other foreign material
from the windshield pinch weld area.
- Use a clean shop towel or oil-free compressed air.
- NOTE:
Refer to manufacturer's instructions before using the Deluxe Windshield Removal Tool.
Lubricate the urethane adhesive with water to aid the Deluxe Windshield Removal Tool when cutting the urethane adhesive.
 WARNING: Always
wear eye protection when servicing a vehicle. Failure to follow this instruction may result in serious personal injury.WARNING: Wear
protective gloves when handling components or parts that have pointed or sharp edges. Failure to follow this instruction may result in serious personal injury.NOTICE: Make sure the cutting blades are changed where the cutting depth changes to avoid damage to the body and trim panels.
NOTICE: To avoid rust formation, use extreme care not to scratch the paint or primer, or otherwise damage the pinch weld during glass removal.
NOTE:
Insert the blade into the Deluxe Windshield Removal Tool so that the flat side is against the glass.
NOTE:
Some resistance may be encountered when cutting through the glass locating pegs in the upper right and lower left corners of the glass.
Using the Deluxe Windshield Removal Tool, start cutting at the top and work towards the corners and remove the rear quarter window glass.
Installation
All vehicles
NOTE:
For additional material guidelines, refer to the manufacturer's installation information.
- WARNING: Repair
any corrosion found on the pinch weld. The pinch weld is a structural component of the vehicle. Corrosion left unrepaired may reduce the structural integrity of the vehicle. Failure to follow this instruction may result in serious injury to vehicle occupant(s).NOTE:
Avoid scratching the pinch weld. Repair all minor scratches or exposed metal on the pinch weld following manufacturer's instructions. Use the same brand pinch weld primer, glass primer and urethane adhesive.
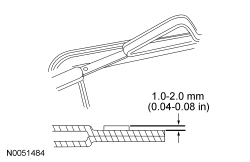
Using an appropriate tool, trim the urethane adhesive leaving a 1 mm to 2 mm (0.04 in to 0.08 in) base of original equipment urethane adhesive on the pinch weld.
- Using a clean shop towel, brush or oil-free compressed air, clean the pinch weld area around the existing urethane adhesive. Remove any foreign material or water that may have entered during glass removal.
- If installing the original rear quarter window glass, remove the excess urethane adhesive.
- Clean the inside of the rear quarter window glass with glass cleaner.
- NOTE:
Be sure to use the same brand of cure-rate products for the urethane adhesive and glass primer. Do not mix different brands of urethane adhesive and glass primer. Refer to the Material Chart in this procedure.
If installing a new rear quarter window glass, apply glass primer according to the manufacturer's instructions. Allow at least 6 minutes to dry.
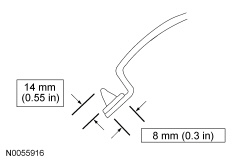
- Cut the urethane adhesive applicator tip to specification.
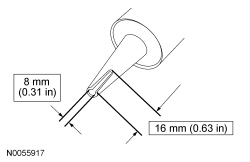
- NOTE:
The rear quarter window glass must be positioned within 10 minutes of applying the urethane adhesive.
NOTE:
Use either a high-ratio, electric or battery-operated caulk gun that will apply the urethane adhesive with less effort and a continuous bead.
Apply urethane adhesive on top of the existing trimmed urethane adhesive bead on the pinch weld, starting and ending at the bottom of the rear quarter window glass near the center, making sure there are no gaps in the bead.
- WARNING: Do
not drive vehicle until the urethane adhesive seal has cured. Follow urethane adhesive manufacturer's curing directions. Inadequate or incorrect curing of the urethane adhesive seal will adversely affect glass retention. Failure to follow these instructions may result in serious injury to vehicle occupant(s).NOTICE: Before positioning the rear quarter window glass, open vehicle windows to prevent the air pressure of closing doors from affecting the urethane adhesive bond.
Install the rear quarter window glass.- Position the rear quarter window glass to the flange, and press the retaining tabs into the flange to engage.
- NOTE:
The urethane adhesive must cure for a minimum of one hour before testing for air or water leaks.
After the urethane adhesive has cured, check the rear quarter window glass seal for air or water leaks through the urethane adhesive bead and add urethane adhesive as necessary.
2-door vehicles
- Install the B-pillar trim panel. For additional information, refer to Section 501-05.
4-door vehicles
- Install the quarter trim panel. For additional information, refer to Section 501-05.
 Window Glass - Rear
Special Tool(s)
Deluxe Windshield Removal Tool
164-R2450 or equivalent
The Pumper
164-R2459 or equivalent
Material
Item
Speci ...
 Window Grid Wire Repair
General Equipment
Polypropylene Film Fine Line Tape (Commercially available)
Material
Item
Specification
Lacquer Touch-Up Paint (match color to exterior grid ...
More about Ford Focus:
Ford Focus Instrument Cluster (IC) - Description and Operation
Item
Part Number
Description
1
—
Tachometer
2
—
LH turn indicator
3
—
Low fuel warning indicator
4
—
Fuel gauge
5
—
Malfunction Indicator Lamp (MIL)
6
—
High beam ...
