Ford Focus Service Manual: Air Conditioning (A_C) Compressor
| Item | Specification |
|---|---|
| Motorcraft® PAG Refrigerant Compressor Oil YN-12-D | WSH-M1C231-B |
| Item | Part Number | Description |
|---|---|---|
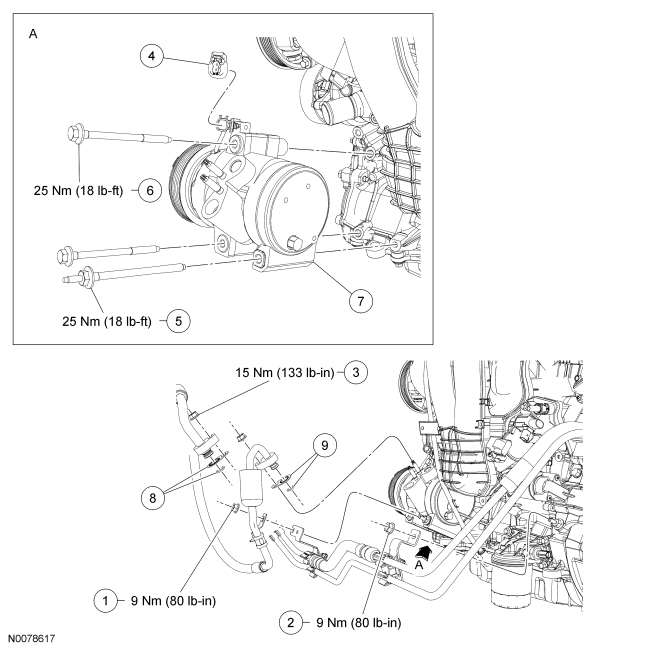
| 1 | W520101 | Compressor-to-condenser discharge line bracket nut |
| 2 | W520101 | Power steering line bracket nut |
| 3 | W520413 | A/C compressor fitting nut (2 required) (suction and discharge) |
| 4 | — | Clutch field coil electrical connector (part of 12A690) |
| 5 | W790024 | A/C compressor stud-bolt |
| 6 | W713281 | A/C compressor bolt (2 required) |
| 7 | 19703 | A/C compressor |
| 8 | 19B596 | O-ring seal and gasket seal kit |
| 9 | 19B596 | O-ring seal and gasket seal kit |
Removal and Installation
NOTICE: If installing a new Air Conditioning (A/C) compressor due to an internal failure of the old unit, the following procedures must be carried out to remove contamination from the A/C system. Failure to remove contamination from the A/C system, if present, will result in poor A/C system performance and/or damage to the new A/C compressor and other components.
- If A/C flushing equipment is available, carry out the A/C system flushing procedure prior to installing a new A/C compressor. For additional information, refer to Section 412-00.
- If A/C flushing equipment is not available, carry out the refrigerant system filtering procedure following A/C compressor installation. For additional information, refer to Section 412-00.
- Install a new Thermostatic Expansion Valve (TXV) , as directed by the A/C flushing or filtering procedure.
- Install a new receiver/drier as directed by the A/C flushing or filtering procedure.
NOTE:
Installation of a new receiver/drier is not required when repairing the A/C system, except when there is physical evidence of contamination from a failed A/C compressor or damage to the receiver/drier. Damage to the receiver/drier includes leaks in the receiver/drier, physical damage to the receiver/drier shell or desiccant, or moisture contamination. Moisture contamination results only from a complete loss of refrigerant, and equalization of the refrigerant system pressure with atmospheric pressure for a period longer than one hour. If even a slight amount of positive refrigerant pressure is present, and physical evidence of contamination from an A/C compressor failure is not present in the system before repairs are carried out, a new receiver/drier should not be installed.
All vehicles
- With the vehicle in NEUTRAL, position it on a hoist. For additional information, refer to Section 100-02.
- Recover the refrigerant. For additional information, refer to Section 412-00.
- NOTE:
The A/C compressor discharge line is held in place by a bracket attached to the lower rear A/C compressor stud-bolt. The A/C compressor discharge fitting cannot be easily disconnected until later in this procedure when the bracket is detached.
Remove the A/C compressor suction and discharge fitting nuts and disconnect the suction fitting.
- Discard the O-ring seal and gasket seal.
- To install, tighten to 15 Nm (133 lb-in).
Vehicles with manual transmission
- Remove the engine cooling fan assembly. For additional information, refer to Section 303-03.
Vehicles with automatic transmission
- Remove the lower radiator air deflector. For additional information, refer to Section 501-02.
All vehicles
- Remove the 2 drive belt shield bolts and remove the shield.
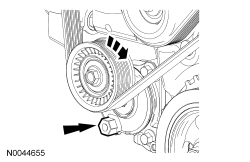
- Release the tensioner and remove the drive belt from the A/C compressor pulley.
- Remove the power steering line bracket nut at the transmission.
- To install, tighten to 9 Nm (80 lb-in).
- Remove the compressor-to-condenser discharge line bracket nut from the lower
rear A/C compressor stud-bolt and detach the discharge line and power steering
line brackets.
- To install, tighten to 9 Nm (80 lb-in).
- Disconnect the A/C compressor discharge fitting.
- Discard the O-ring seal and gasket seal.
- Disconnect the clutch field coil electrical connector.
- Remove the 2 A/C compressor bolts and the A/C compressor stud-bolt.
- To install, tighten to 25 Nm (18 lb-ft).
- Remove the A/C compressor.
- To install, reverse the removal procedure.
- Install new gasket seals and O-ring seals.
- Lubricate the refrigerant system with the correct amount of clean PAG oil. For additional information, refer to Section 412-00.
- Evacuate, leak test and charge the refrigerant system. For additional information, refer to Section 412-00.
 Compressor
...
 Refrigerant System Filtering Following Air Conditioning (A_C) Compressor Installation
Special Tool(s)
A/C Flush Adapter Kit
219-00074 or equivalent
A/C Flush and Purge Fitting Kit
219-00024 or equivalent
Material
It ...
More about Ford Focus:
Ford Focus Safety Belt System
WARNING: After
any crash, all of the following safety belt assemblies and attaching hardware must
be inspected to verify correct function:
Retractors
Buckles
Belt tension sensor (BTS) (if equipped)
Front safety belt buckle support assemblies (slide bar) (if equipped)
Safety belt s ...
