Ford Focus Service Manual: Generator
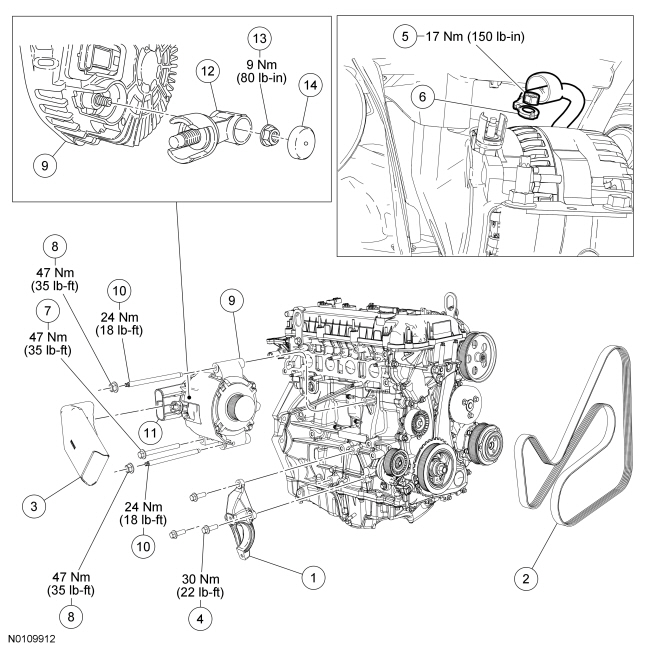
| Item | Part Number | Description |
|---|---|---|
| 1 | — | Center support bracket |
| 2 | 6C301 | Front End Accessory Drive (FEAD) belt |
| 3 | 10C392 | Generator lower air duct |
| 4 | — | Center support bracket bolt (3 required) |
| 5 | W711953 | Generator B+ terminal nut (part of 10300) |
| 6 | — | Generator B+ terminal (part of 14A280) |
| 7 | W500130 | Generator bolt |
| 8 | W520414 | Generator nuts (2 required) |
| 9 | 10300 | Generator |
| 10 | W709489 | Generator studs (2 required) |
| 11 | 10C392 | Generator upper air duct |
| 12 | 10329 | Radial arm adapter |
| 13 | — | Radial arm adapter nut (part of 10329) |
| 14 | — | Radial arm adapter cap (part of 10329) |
Removal
NOTE:
The radial arm adapter is a serviceable item. Do not replace the generator if the radial arm adapter is the only concern.
- With the vehicle in NEUTRAL, position it on a hoist. For additional information, refer to Section 100-02.
- Disconnect the battery. For additional information, refer to Section 414-01.
- Disconnect the generator electrical connector.
- NOTE:
Do not remove the RH halfshaft to install a new radial arm adapter. The RH halfshaft only needs to be removed if installing a new generator.
Remove the RH halfshaft. For additional information, refer to Section 205-04.
- Remove the 3 bolts and the center support bracket.
- Remove the 2 screws and the accessory drive splash shield.
- Rotate the Front End Accessory Drive (FEAD) belt tensioner clockwise and remove the belt from the generator drive pulley. Position the FEAD belt aside.
- Release the 2 retainers and remove the lower generator air duct.
- Position the protective cover aside, remove the nut and position the generator B+ terminal aside.
- Remove the 2 generator nuts.
- Remove the 2 generator studs.
- Remove the generator bolt and the generator.
- If necessary, remove the bolt and the generator upper air duct.
Installation
- If removed, install the generator upper air duct and the bolt.
- Tighten to 12 Nm (106 lb-in).
- Install the generator and generator bolt. Hand-tighten the bolt. Do not torque the bolt at this time.
- Install the 2 generator studs.
- Tighten to 24 Nm (18 lb-ft).
- Install the 2 generator nuts.
- Tighten to 47 Nm (35 lb-ft).
- Tighten the generator bolt.
- Tighten to 47 Nm (35 lb-ft).
- Position the generator B+ terminal on the generator and install the nut.
- Tighten the nut to 17 Nm (150 lb-in) and position the protective cover on the nut.
- Install the lower generator air duct.
- Rotate the FEAD belt tensioner clockwise and install the FEAD belt.
- Position the accessory drive splash shield and install the 2 screws.
- Tighten the screws to 5 Nm (44 lb-in).
- Install the center support bracket and the 3 bolts.
- Tighten the bolts to 30 Nm (22 lb-ft).
- Install the RH halfshaft. For additional information, refer to Section 205-04.
- Connect the generator electrical connector.
- Connect the battery. For additional information, refer to Section 414-01.
 Charging System
The charging system is a negative ground system consisting of:
a generator with an internal voltage regulator.
a charging system warning indicator.
a battery.
circuitry and cables.
a ...
 Data and Communication Network
NOTE: The Smart Junction Box (SJB) is also known as the Generic Electronic
Module (GEM) .
Multiplexing is a method of sending 2 or more signals simultaneously over a single
circuit. Multiplexing ...
More about Ford Focus:
Ford Focus Engine compartment overview - 1.6L Duratorq-TDCi (DV) Diesel
A. Screen washer fluid reservoir*: See Washer fluid check.
B. Engine coolant reservoir*: See Engine coolant check.
C. Brake and clutch fluid reservoir (right-hand drive)*: See Brake and clutch
fluid check.
D. Engine oil filler cap*: See Engine oil check.
E. Brake and clutch fluid reservoir ( ...
Nissan Frontier - Instrument Panel - Keys - Brake system
